TL;DR Recently, my EERO Home Wifi System alerted me that it would be end of support this month. That meant I would need to replace it at some point and it gave me a crazy idea. Could a small form factor computer replace some of the functions of a router? What about a server? Could I add virtualization to it and migrate Virtual Machines from a Dell PowerEdge server? How far could I go? What kind of hardware would be needed? What would that look like?
Calculating the requirements:
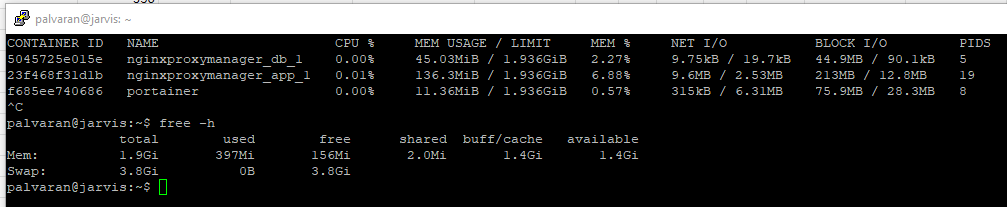
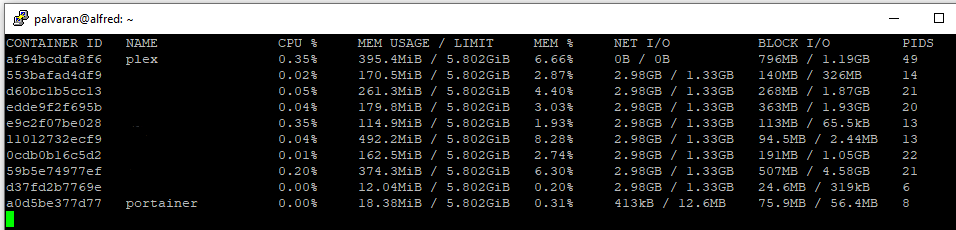
The first thing I needed to do was figure out what I really wanted to move. I run a variety of Virtual Machines with different operating systems, but for this project I wanted to move two Ubuntu servers that are running Docker for my containers. These containers ran the gamut from reverse proxy via NGINX to Plex. After logging into my Ubuntu servers and running the docker stats command I was able to see the true usage. This is important as ESXi and other hypervisors do not necessarily report the true utilization.

For comparison here is what ESXi reports. The values that you set such as for memory are more of the threshold of what amount of memory has been assigned to that particular Virtual Machine. In this way, you are able to overcommit memory. In other words, if a system only has 16 GB of memory, you could setup multiple Virtual Machines that are set to use more than that amount. However, if there is a run on the bank and all of the Virtual Machines need the memory at the same time, that is when errors and crashes will occur.

Next, we need to plan for the pfSense Virtual Machine. Let’s check what the hardware requirements look like. Note, this would be simply routing without any firewall rules or customizations.
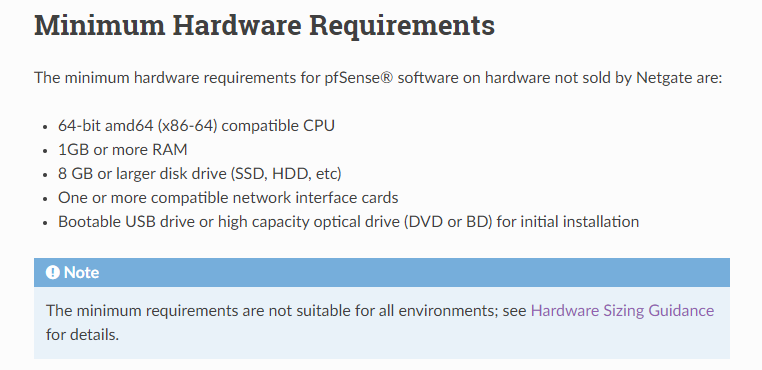
As many know that is is the barebones configuration. So what does the Hardware Sizing Guidance tell us?
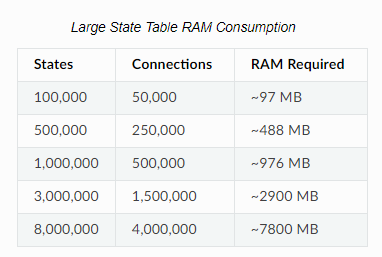
In reality, for the majority of users, 1 GB of memory for Large State Table should be more than enough. Added to the hardware requirements and we are looking at 2 GB in total so far. What about Netgate themselves? What are the specs of their devices that they sell? Below is a chart of their non rackmount units.
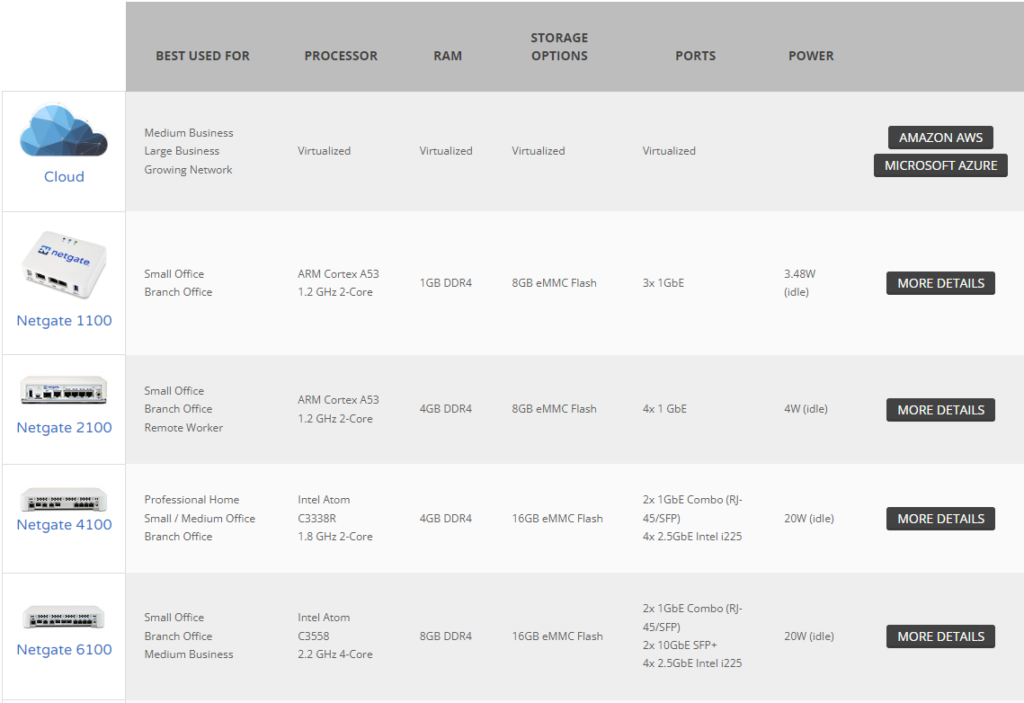
Notice the biggest device uses 8 GB of memory which is way more than we would need in reality as that is targeted for medium sized businesses. This means that we should be able to safely accommodate up to 4 GB. Putting that all together and here is what this scenario looks like for those Virtual Machines. Notice I put in the specifications of the biggest Netgate appliance just as a reference to show how much total hardware would be needed.
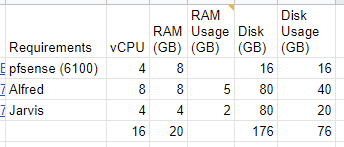
Also, don’t be alarmed by the 16 vCPUs. In VMware land, the optimal configuration is usually a 4:1 ratio of vCPU to pCPU. Essentially, what is occurring is time slicing. Something to remember is that no Virtual Machine is busy all the time. If it is, then it is not designed efficiently and needs to be rearchitected.
What I decided on:
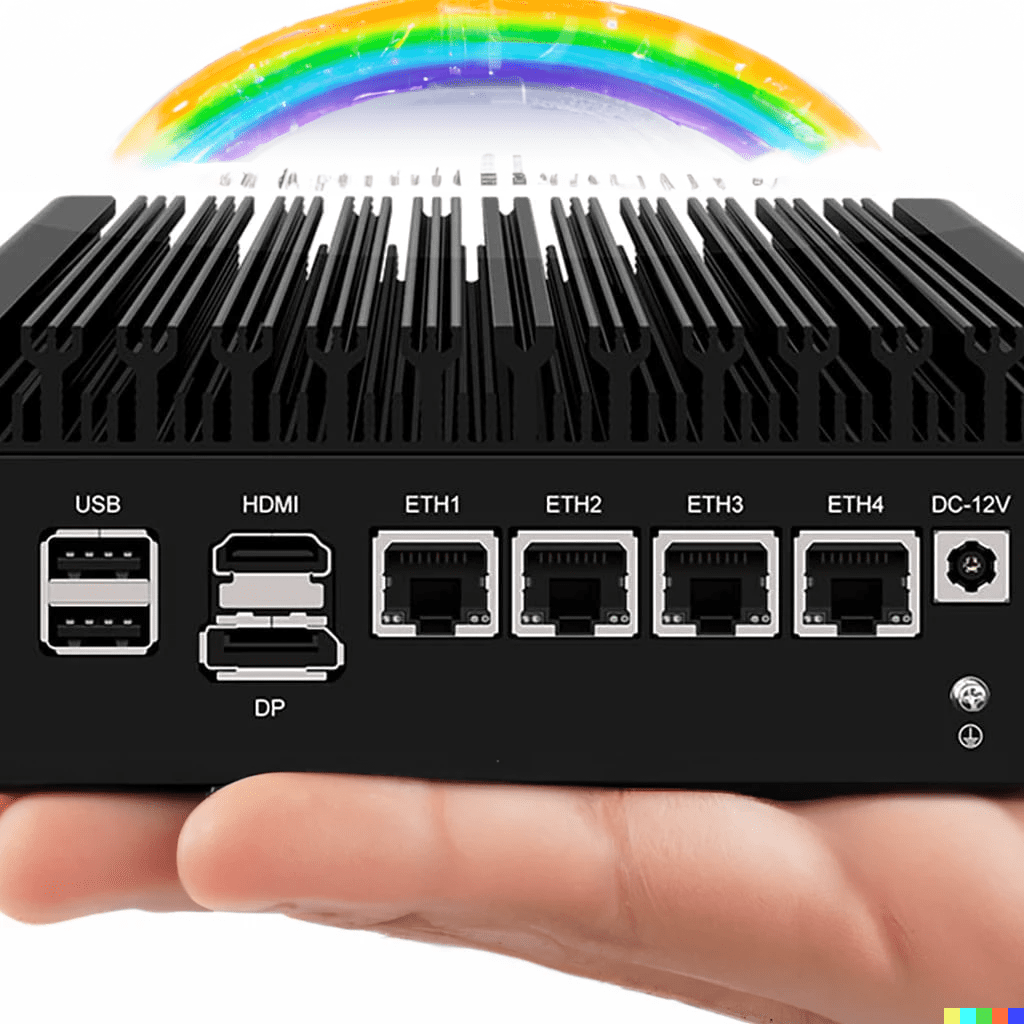
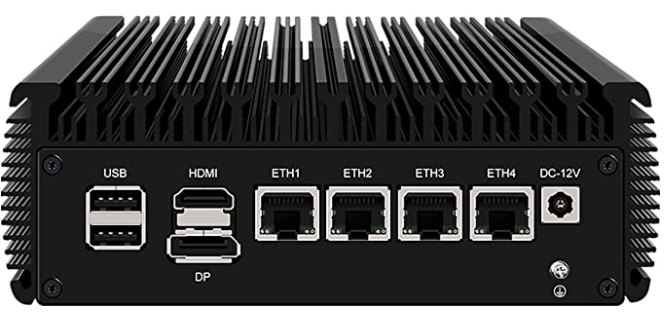
I made a spreadsheet of the 7 possibilities I had in mind, but in the end, I chose the HUNSN RJ03. It appears to check off all the boxes for my requirements. It is small, silent, and power efficient, yet powerful enough to run Plex and other services. Here is what it looks like physically.
Device Overview and Breakdown:
I chose it for the following reasons:
- 4 Network Ports that are each 2.5 GB capable
- 2 DDR4 Memory Slots
- Intel Celeron N5105
- Multiple Drive options (1 SATA, 2 M2)
- Low Power (PoE)
- Passive Cooling via the Case itself
First Win – Network Ports (But need to separate routing and wireless functions).
The four network ports seems like overkill, but I will be using 2 of them for pfSense to control the routing and firewall controls. One will be for the WAN which connects to the ISP and one will be connected to the LAN switch.
My decision was catalyzed as my EERO Home Wifi System alerted me that it was End of Life as of September 30th of this year. That meant that I needed to plan for a replacement. Looking around and I decided the best thing to do was separate the routing from the wifi components. By doing that, it allows for greater flexibility in that you can upgrade the components at different times and control the integration at a granular level. Additionally, this meant that I could go back to open source routing.
Previously, I used DD-WRT to run a mesh network at my home. Essentially, I was running open source firmware on Linksys and Netgear routers that allowed them to talk to each other and extend my network out. While that provided great coverage, the limitation is that it reduces the speed of the network. The reason is that each access point that you go through reduces the overall transfer speed by half and also increases the latency.
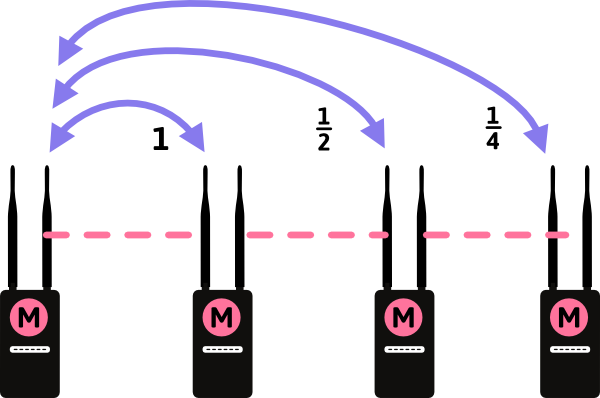
This means that if you are talking directly to the primary router (The M on the left side of the image) you get full speed. In a Wireless N network that would be 300 Mbps. However, if you are talking to the access point on the far right, that would be 300 Mbps divided by 4 for a total bandwidth of 75 Mbps. Unfortunately, the latency on the far right access point will be 4 times higher as well, not a great thing for online gaming.

Enter the EERO system. Years ago, EERO was a Kickstarter backed project. I was impressed with all of the functions and simplicity it had as well as features such as a wired backhaul. This mean that each of the access points in the above diagrams were connected via ethernet cables. This allows each of the access points to have the full spectrum of bandwidth. In our Wireless N example above, that means each access point radio has a full 300 Mbps available.
In my scenario, with the decision to separate the routing and wireless operations, that still allows the option to run the wifi in a bridged mode. In this configuration, the access points simply connect wireless devices to the network, what they are optimally designed for. DHCP and routing is handled by the router which in this case will be pfSense.
Buy why 4 network ports?
By now you are wanting to know why a device needs 4 network ports. The short answer is virtualization and assigned network ports to different virtual machines. The longer answer is the following.
For virtualization, I chose ESXi. It is one of the Gartner top options for virtualization and because this is for a Home Lab, I can download a free community license. I also happen to be very familiar with it as I have been using it since the version 4.x days. ESXi gives you close to bare metal speed due to the maturity of the product. It is reliable, flexible, and powerful. It can do snapshots which means that when you need to perform an upgrade, you have a guaranteed method of recovery. It is flexible in that if your Virtual Machine does not have enough resources you can simply allocate additional compute, memory, or storage. You can even dedicate hardware if necessary such as a GPU, USB, etc. Heck, I even tried to perform local inputs ala keyboard and mouse while outputting video out from a local computer running ESXi and assigned those hardware devices to it. The theory I had was that I would have the best of multiple worlds. I would not need vPro if I could simply login to the ESXi host and see the Virtual Machine. Plus, I would have features such as snapshots and vMotion migrations. That meant that if I needed another machine, I could simply migrate it to a larger and more powerful machine and allocate additional resources. Additionally, since the Virtual Machine is simply a VMDK file you can back it up or transfer it to another machine easily using something like WinSCP.
In the case above, we will be assigning two dedicated network ports to the pfSense Virtual Machine (one for the WAN/internet and one for the LAN/local network) leaving 2 others available.
So what is pfSense?
pfSense is a lightweight network appliance or Virtual Machine that can do DHCP, DNS, VLANs, Firewall, VPN, etc. This means you can route traffic, protect traffic, filter out traffic, and securely encrypt traffic. Want to improve your network speed and prevent guest devices getting to it? Check. You can setup a VLAN. Want to have a custom filter so that some websites are not accessible? Check. You can do that too. Want to setup a VPN so that all your traffic leaving your home is encrypted? Check. You don’t even need to install software on your devices anymore.
You can even do Multi-WAN.
What is that and I why do you need it? Think of it this way. Most people only have 1 internet provider at home such as from a cable or telephone company. What happens when that internet connection goes out? Many people either give up until it comes back up or they try to use their phones to connect to the internet in a limited fashion. Multi-WAN allows your home to have multiple internet connections configured so that if one goes out then the other takes over. Cable having a problem? No problem. pfSense can turn over the duties to the telephone company’s internet. This is known as Active-Passive Failover.
Did you know you can even shotgun the internet connections together for even more speed? This means you can combine the download and update rates of multiple internet providers for even greater bandwidth while simultaneously increasing any network bandwidth cap limits. The reason is pfSense can do load balancing which makes it like a traffic cop directing and distributing traffic evenly balancing the internet traffic. Fun fact, back in the 90s, some people had multiple phone lines and would get modems that supported bonding those lines together. If you had two phone lines plugged into a Diamond Multimedia model that supported shotgunning them together, then instead of a 56K speed limit you had a 112K speed limit. At the time, this meant that you were closing the gap on ISDN‘s download rate which was typically around 64K to 128K.
To get the Multi-WAN going, you can simply dedicate an additional port. In the case of the HUNSN RJ03 that would mean giving the Virtual Machine 2 of the 4 ethernet ports for WAN (internet connections) and 1 additional ethernet port for the connection to the LAN (local) switch. This leaves us with 1 additional and free ethernet port that we can use for our ESXi hypervisor to use for the other Virtual Machines. Don’t forget that each of those ethernet ports can be run at 1 GB or 2.5GB. Either of those are more than enough bandwidth for our remaining port and the other Virtual Machines.
A great tutorial on installing and configuring pfSense can be found via NetworkChuck. He is a wizard with not just his skills, but his explanations and passion too. He even convinced me to setup this webpage up in the first place.
Second Win – Memory.
The key to a hypervisor is almost always the memory. Processing is rarely a problem, but running out of memory or space will limit what you can do every time. The HUNSN RJ03 has 2 SODIMM DDR4 memory slots. Each one is supposed to be capable of running 16 GB for a possible 32 GB total, but after calculating the memory usage from the Virtual Machines we will be migrating from the Dell PowerEdge R430 it appears that 16 GB is adequate. Normally, I would propose running memory in multiple slots so that you can interleave the memory for additional speed, but running a single memory stick in this scenario reduces our power usage and by extension our heat. As the goal of this hypervisor is to be silent and low power, that checks both boxes. However, the second slot being free allows for expansion in the future.
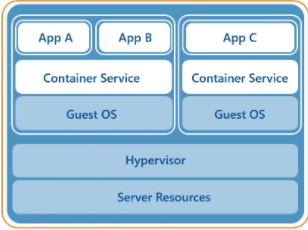
You might think that we need way more memory to run Virtual Machines, but we are running Ubuntu Server which is running Docker and containers. Because of containers, we do not need to run an entire operating system, but instead just the application itself. If you remember in my previous article on IT – Demystifying The Cloud – Part 1 (AWS: Why, What, And How) I explained the differences between containers, virtualization, and traditional iron. Here is the configuration I am currently running.
The layout of the Virtual Machines we will be migrating to the HUNSN RJ03 are the following.

Note, we still need to add pfSense to this list.
Third Win – Intel Celeron N5105.
Confession time, I will always have a soft spot in my heart for the Intel Celeron lines. I remember one of my earlier overlocks. I was following the development of the Celeron processor and purchased one of the first 300A series. At the time, I remember checking to see if it was manufactured in Malaysia or another factory. In the end, it didn’t matter as the chip itself was essentially the same as a Pentium II, but with on die cache meaning that the memory was running at the speed of the processor rather than off die and running at half the speed compared to the Pentium II. This presented some interesting opportunities in that if you could overclock the processor from the 300 MHz it was running from the factory to a higher speed, then the memory would go faster too. Clock for clock, this meant that a Celeron was faster than a Pentium II.
In my case, I was able to run that same 300 MHz processor at 464 MHz. I chose 464 MHz over 450 MHz as it meant the peripheral bus was overclocked as well (103 MHz vs 100 MHz) and in theory would allow peripherals such as video cards to operate at a faster speed. Later on I upgraded another “Celery” from a 366 MHz to 566 MHz by performing the same steps.
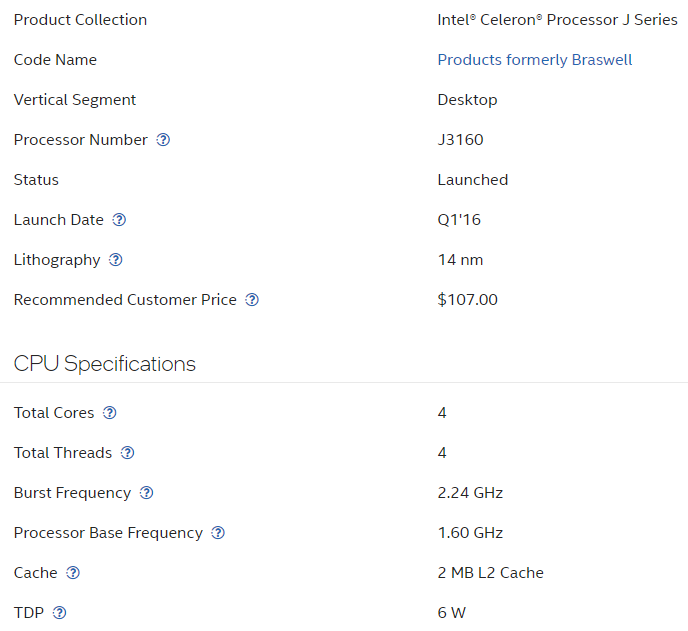
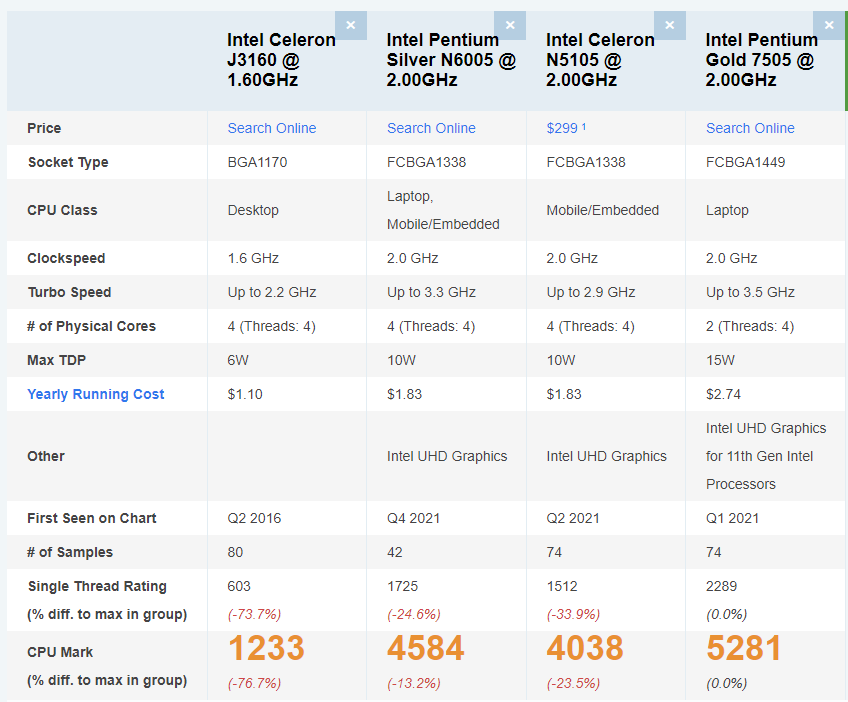
For this project, I looked at many processors ranging from the most popular devices for consumer or small businesses such as a Protectli FW4B or a Netgate 1100. Both are good devices, but the Netgate 1100 can start to slow down as you add on more services and features ala firewall rules. This is due to the processor and memory being undersized. While they are low power and reliable, they are using fairly old hardware. In the case of the Protectli FW4B, it is using an Intel Celeron J3160. In the case of the Netgate 1100, it is using a Marvell ARMADA 3720.
Here is the Intel N5105 vs the Intel J3160. The N5105 is a relatively new chip especially when you consider the other network appliances out there. Notice below that the J series is 5 years older than the N series. In technology terms that is ancient especially given Moore’s Law.

If you are wondering how the Netgate 1100 processor compares take a look below.
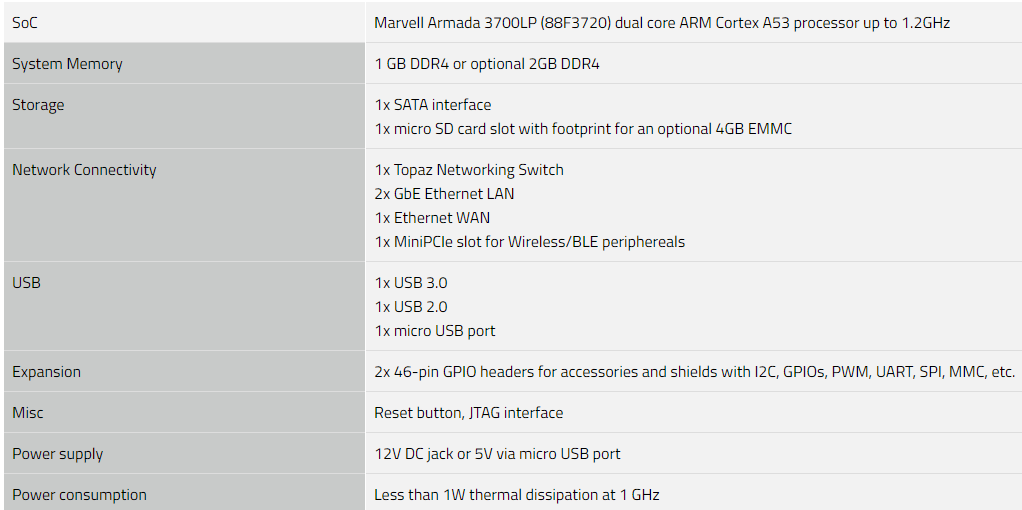
Considering the Armada 3700 only has 2 processor cores capable of a burst to 1.2 GHz and that eliminates it from being able to run multiple Virtual Machines. As for the Intel J versus N series, the J is decent and probably adequate, but the N gives a bit more breathing room regarding processing. As a point of reference, I also looked at the Intel Pentium N6005 and Pentium Gold 7505 and while solid and fast processors, they just were a bit too expensive and used a bit too much power as evidenced by the TDP.
So why does processing matter so much for a network device?
The Netgate 1100 is a perfectly good device for what it does. In our case, we are trying to maximize the silicon itself and that means running multiple services via a hypervisor. One of those devices we will be running is Plex. Plex is one of the best media streamers out there and allows for transcoding. This means that it can take a high resolution video and re-encode it as a lower quality video which is important for lower resolution screens or mobile devices. After all, running 4K everywhere just is not ideal from a network perspective or even a device perspective if the resolution or hardware does not allow it to display. However, to do that takes either CPU or GPU power.
Here is what Plex states on their support page.
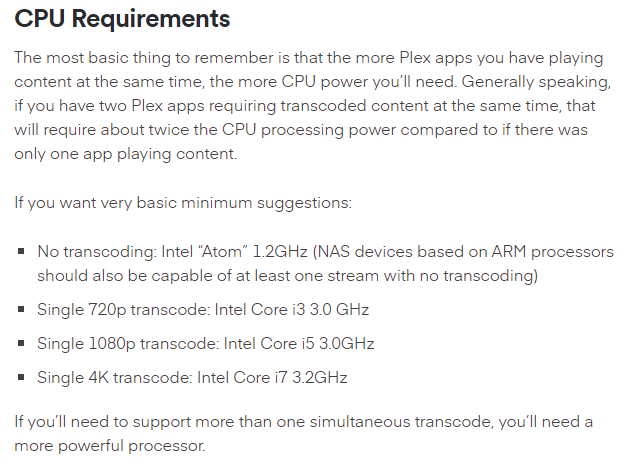
As you can see the 1.2 GHz processor would not even be physically capable of re-encoding video at all. However, the J and N series are capable.
Fourth Win – Multiple Drive Options.
The HUNSN has multiple drive options via two M2 slots and a traditional SATA connection. Ideally, an NVME option is preferred since it uses very little power which means less heat in a small size. However, it was ideal having additional options. In ESXi, if desired, you could have multiple drives and multiple datastores or even perform a copy from one datastore over to another. In this case, we will only use it for running the hypervisor itself. All of the Virtual Machines will live on via an iSCSI connection to a TrueNAS server. We simply repoint the iSCSI connection from the Dell PowerEdge R430 over to the HUSNS RJ03 and all of the Virtual Machines will be seen. From there, just verify the settings such as memory and processors to make sure they are set correctly.
Fifth Win – Low Power.
I think this is an underestimated area of importance for several reasons. While in some countries power is cheaper, in others it can be expensive to run a device 24 hours a day year round. Additionally, extra power translates to extra heat which means extra cooling is needed which means even more power. It can be an expensive cycle to chase. Part of the reason I chose the HUNSN RJ03 and the Intel Celeron N5105 is that it uses so little power that it can even run off of a powered over ethernet cable. The processor itself uses 10 watts of power at peak while the entire system uses less than probably 30 watts of power. The idea of a single cable going to a device and providing everything needed from communication to power is intriguing. It brings to mind the concept of minimization to maximize effectiveness. What is the old adage? The best System Administrator is a lazy System Administrator?
Sixth Win – Passive Cooling.
Passive cooling is an interesting idea. It removes a breakable component via the fan, but it only works if the heatsink is large enough to absorb and dissipate the heat. Originally, when I set up the system, it turned out to not work. The ESXi host would reboot itself several times a day. In the end, I was forced to dismantle the system, remove the processor, and reapply fresh thermal compound between the processor and heatsink. While I do not have a temperate reading since I am running ESXi, it is no longer rebooting which is a win from a stability perspective.
Putting it all together:
Probably the trickiest part is getting the correct network drivers for ESXi. Unfortunately, out of the box, the hypervisor does not include drivers for the Intel I225-V built in natively. This means that your options are to compile a version with the VIB driver installed or install the driver later on via a USB drive.
How does it look?
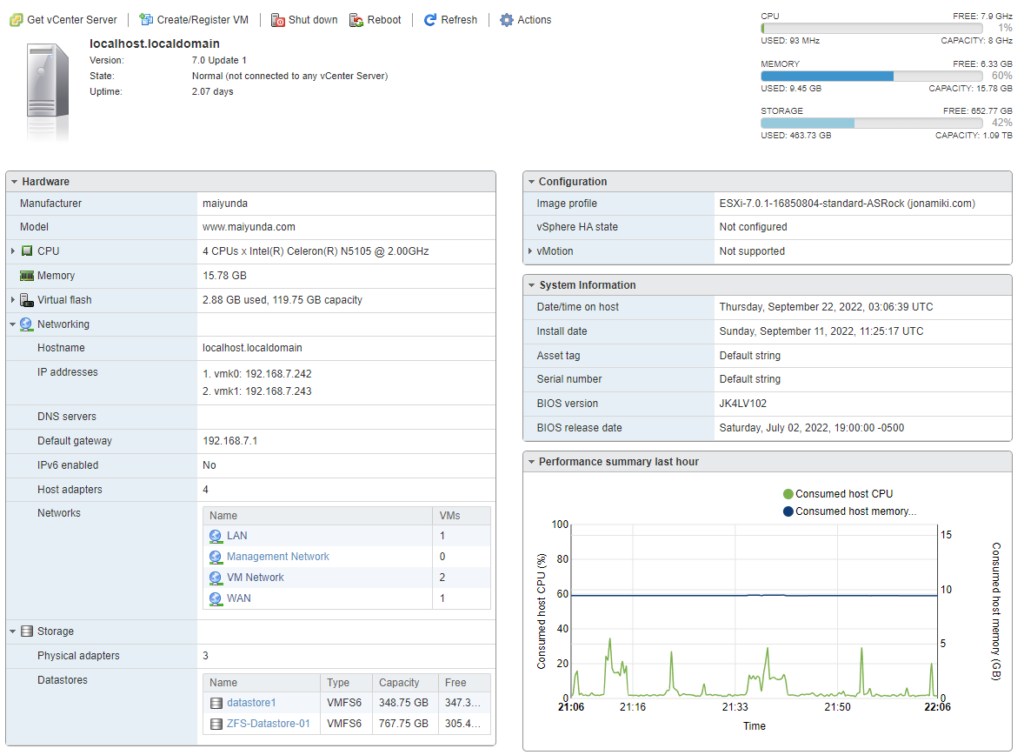
When ESXi is installed here is what it looks like.
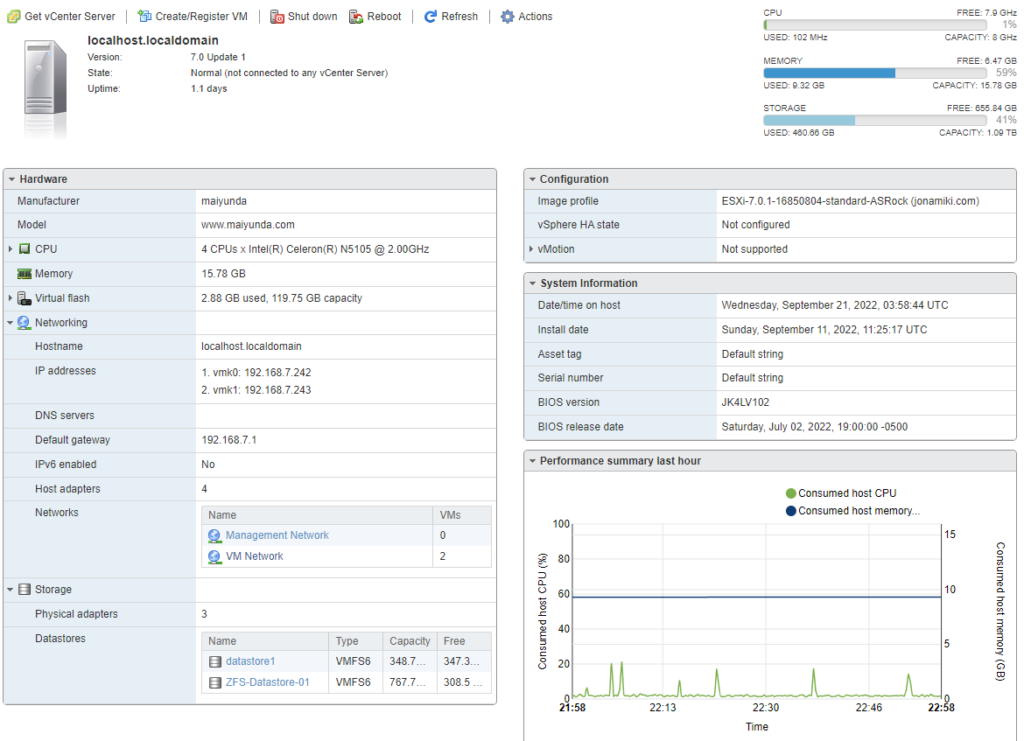
Jarvis and Alfred are both Ubuntu servers running Docker and containers.
Performance Testing:
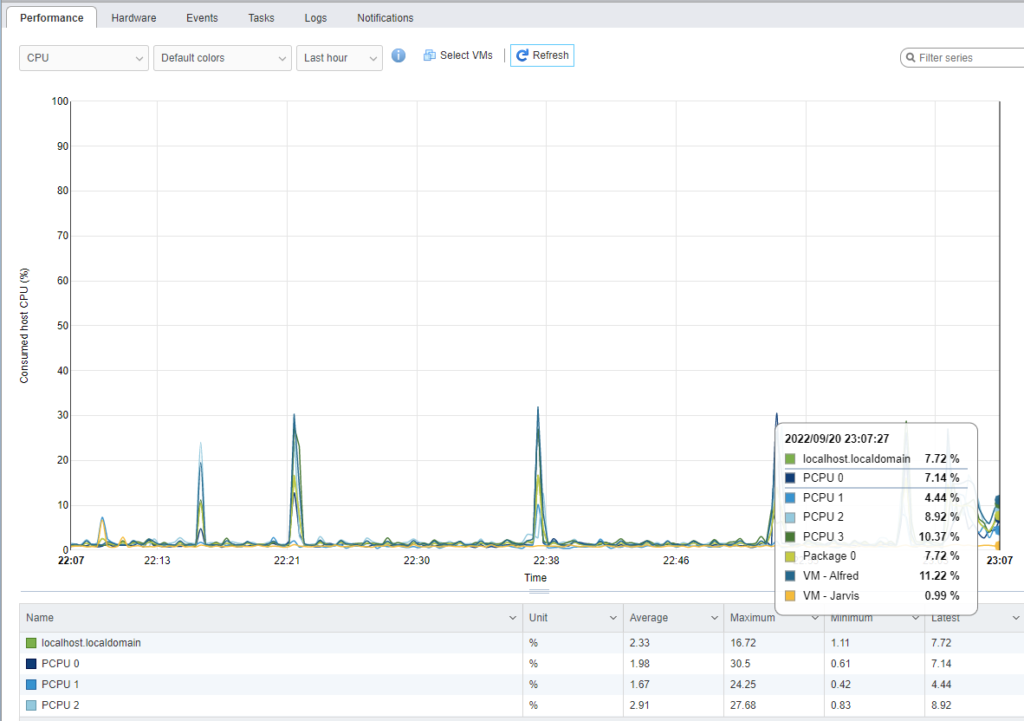
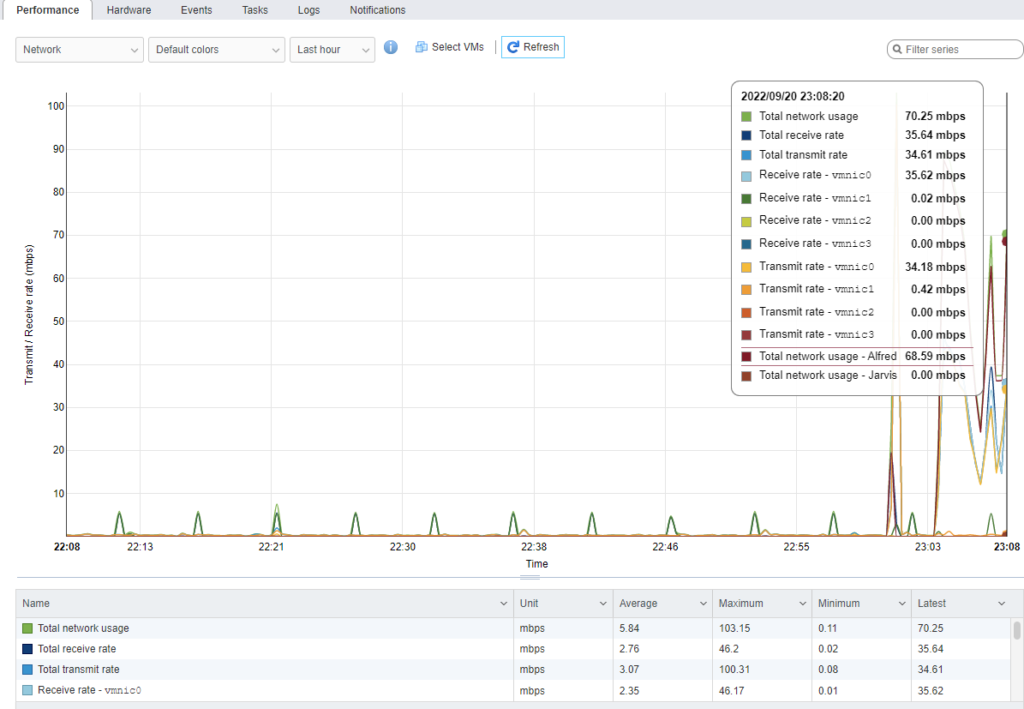
As soon as I migrated the Ubuntu server with Plex on it I wanted to see what kind of performance I had. I started streaming a 4K video and went to monitoring on the ESXi host to see what it looked like from different metrics. Here it shows the processor ramping up to over 11% of total resources.
Next, I wanted to see how much network bandwidth was being used. As this is a 4K stream, I expected it to be high. From the chart, it shows that it is using about 69 mbps. Keep in mind the theoretical transfer speed of a Gigabit connection is 125 MB/s. Essentially though, only half of the network bandwidth is being used from a single connection. If we were to use 2.5 GB cabling and switches then that maximum theoretical bandwidth would go up past 300 MB/s.
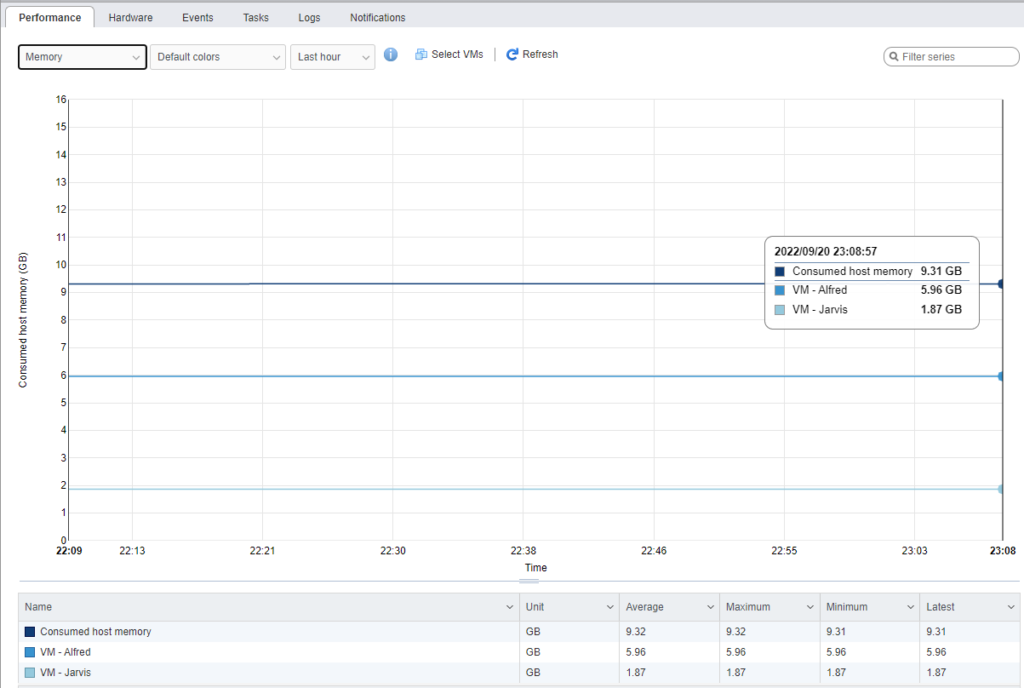
In VMware, when you allocate memory to a Virtual Machine it does not show the usage. That is why the line is flat. This is why at the beginning of the article I went to the Ubuntu server itself to check the memory usage from the command line.
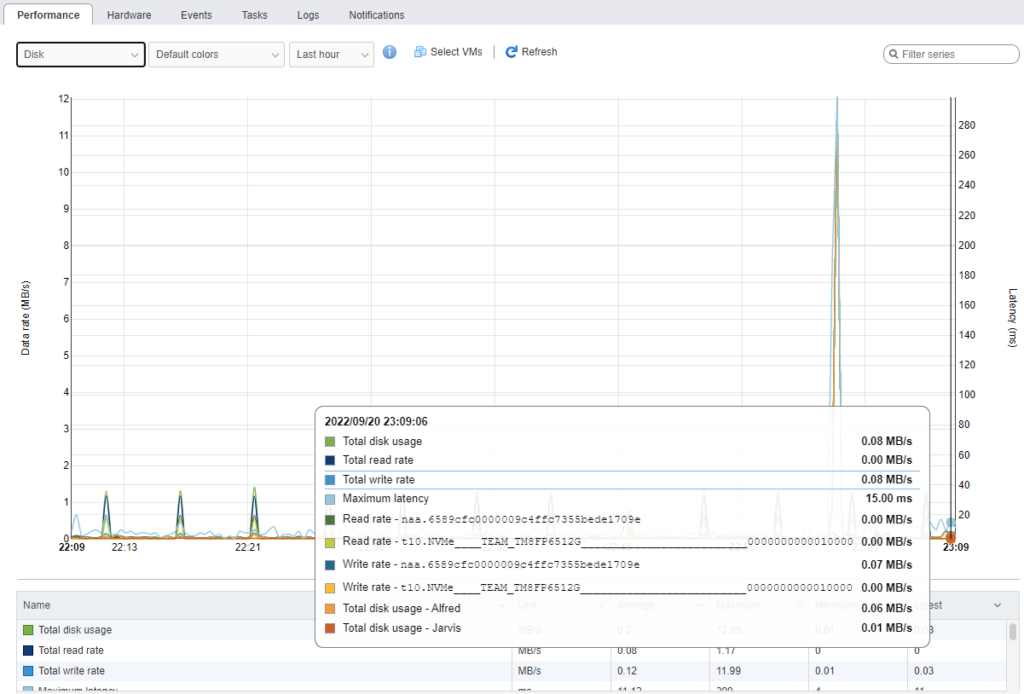
I debated whether to put disk on here, but just to show that there is nothing up my sleeve here via the local disks. All traffic is being routed via the network.
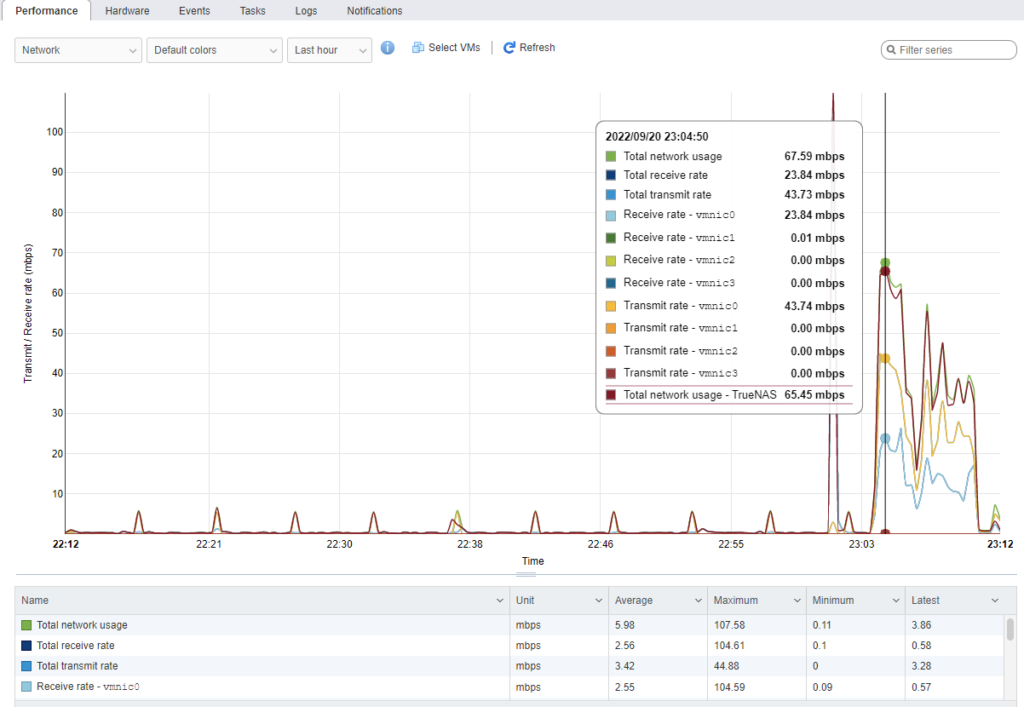
For comparison, here is my TrueNAS Virtual Machine which is currently running off of the Dell PowerEdge R430. The spike is when I started a stream.
So it all works. We answered part of the original question. Yes, you can run some servers and services on a small form factor computer that is virtualized. The only remaining question is pfSense and running the routing aspects.
Time for pfSense.
The best guide I have seen on explaining how to setup pfSense is from NetworkChuck. He demonstrates step by step how to install and configure it. However, as we virtualized it we also consulted the pfSense documentation as we needed to size and configure the Virtual Machine.

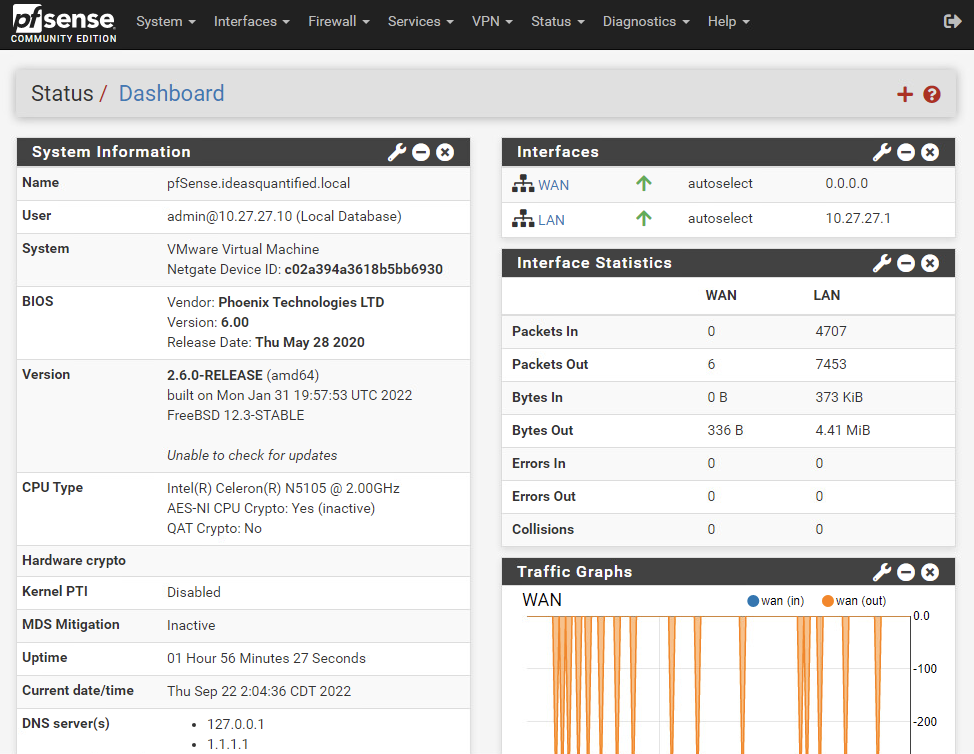
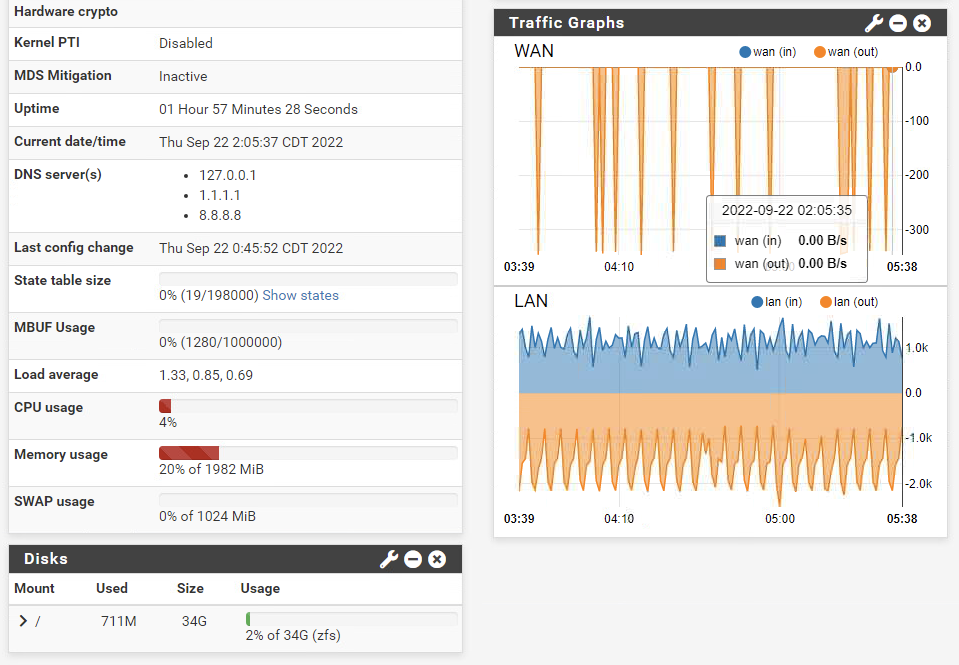
After spinning up pfSense and configuring the LAN, I verified the new IP address was assigned via DHCP. Notice that I even spun up a 4th Virtual Machine which is consuming more resources, but this HUNSN is running it all well. Note, pfSense is not reporting its IP address or Host name as I do not have Open-VM-Tools installed yet.

After installing it and configuring the LAN here is what my initial configuration looks like. I have not moved the WAN over yet as I have to put in a change control with my household in order to perform any service disruptions. This, dear reader, is another reason why having two internet connections is important.
It is truly a lightweight and code optimized service. Notice the processor and memory usage out of the box.
Summary and Closing Thoughts:
So yes. The answer is yes. Where there is a will, there is a way.
Yes, you can migrate routing functions to open source software. Yes, you can virtualize it. Yes, you can add additional servers to it. Yes, it can run low power without a fan and be silent. Yes, it can be performant and able to run those same services. In the end, you can go farther than you originally thought if you take your time sharpening your axe first and as Stephen Covey says, begin with the end in mind.