
TL;DR We will analyze the different cloud providers and determine what we can get in the free tiers. Then, we will build VMs in different clouds for increased high availability. We will setup a domain, DNS via nameservers, as well as configure replication between our locations.
In my quest to figure out how to get my own personal mail server working with an ISP that blocks smtp traffic has proven to be more challenging than I expected. At this point I have setup both iRedmail and Mailcow. Using sendinblue as a smartrelay I can send traffic successfully, but I am not able to receive emails yet. However, it got me thinking.
My employer has pushed me more and more into the public cloud to where I am now the admin for AWS and GCP. Because of that, at home, I am also running AWS and GCP environments and it has made me want to see what I can build in a multicloud — for free.
To start the planning process, I needed to know what core infrastructure I can use for each of the providers in the always free tier. I focused solely on compute and storage and did not focus on the databases or other aspects that are given out. Also, please note that cloud providers can be tricky and some will only let you be free for the first 12 months. I am looking at you Azure and AWS.
So let’s start with the core infrastructure. What can we get for free?
Hardware Availability
Oracle (OCI) is the most generous. They give a lot of things for free. It is impressive that they give not 1, not 2, but technically 6 VMs. But wait, there is more! You get 200 GB of block storage. Remember that number as it is almost 7x bigger than the next most generous provider. As a reference, if you have a 100 GB Google Drive like myself, you pay $2 a month so this could be configured to be like a $4 a month 200 GB Google Drive if desired. The other big desired feature is the amount of memory available. With 24 GB of RAM for the ARM based VM, that would make a beefy server to host docker and containers.
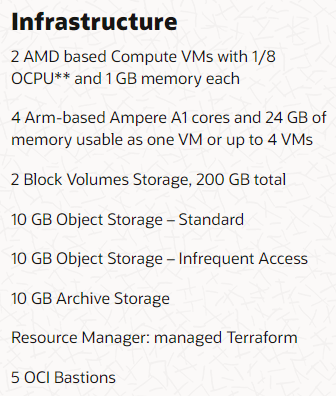
But as with all things, there is a reason for that. They are one of the smaller cloud providers and ranked 5th on the Gartner Magic Quadrant. Training and Jobs for OCI are pretty sparse compared to the Big Three as well.
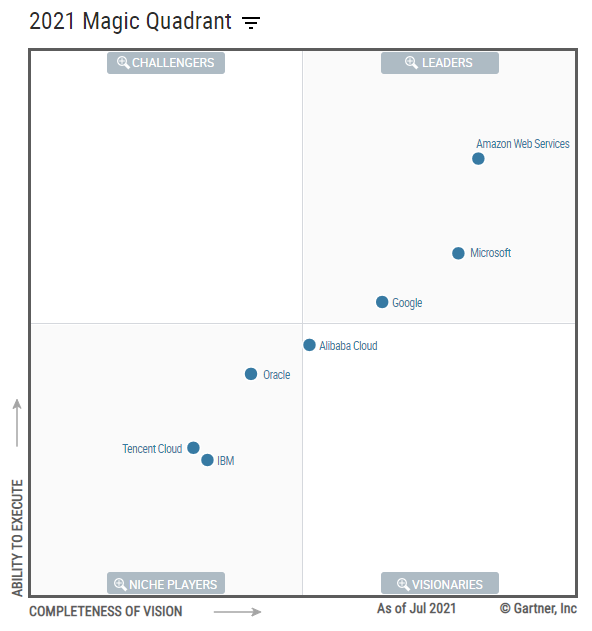
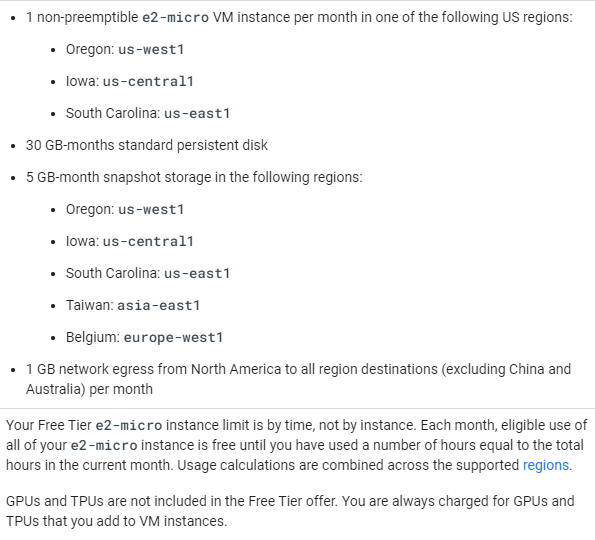
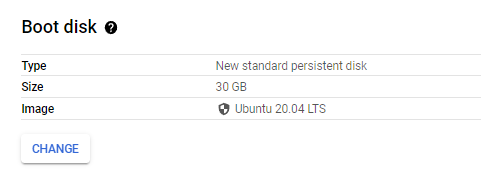
Google (GCP) is the next most generous, but they are 3rd on the Gartner Magic Quadrant. They are also growing at an extremely fast rate at 66% year over year. Here is what they offer in their free tier. You can get a single VM with a 30 GB drive. That will do for our needs.
Microsoft (Azure) does not currently offer any free compute resources.
Amazon (AWS) also does not currently offer any free compute resources. However, I have a 1 year reservation for a t4g.nano EC2 instance which has 2 vcpus and 512 mb of memory. Basically, it is like a raspberry pi that costs $1.90 a month. I used it to experiment with DNS and latency between Houston and Northern Virginia so that I could model what network traffic would look like for my employer from a lag perspective as well as build a cost comparison between our on premise infrastructure versus different public clouds.
In my case I have the following compute resources available to me:
2 Oracle servers [1 vcpu, 1gb]
1 Oracle server [4 vcpu, 24gb]
1 Google server [2 vcpu, 1gb]
1 Amazon server [2 vcpu, 512mb] (optional)
Now begins the planning for what services can be run and where.
Software Requirements
Currently, I am running a WordPress site on an Amazon LightSail instance and will need to migrate that along with possible DNS records to a custom nameserver. At home I have a Dell R430 I am running with TrueNAS and ESXi. It hosts bitwarden, pihole, nextcloud, nginx proxy manager, and some other docker containers with testing images including mailcow, iredmail, and cyberpanel which I will have to settle on.
At work I architect solutions based on one of the 7 Habits by Stephen Covey, “begin with the end in mind.” For me, that means that for solutions that deal with end points, I sometimes work backwards or in reverse to get an idea from both directions. For example, if you want to make sure you are building a proper sized Virtual Machine for someone, then I begin by looking at the software and hardware requirements from the application vendor. I will then matrix that out and look for the least common denominator to make sure it is sized adequately for all of the required software applications.
For example, here is what CyperPanel requires.
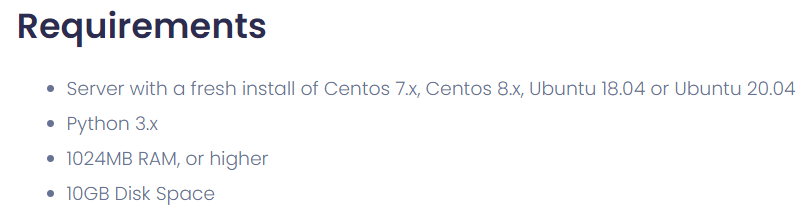
After gathering up all of the vendor requirements, here is what it looks like in a spreadsheet based on the following needs: Now it is time to figure out what service will go where.
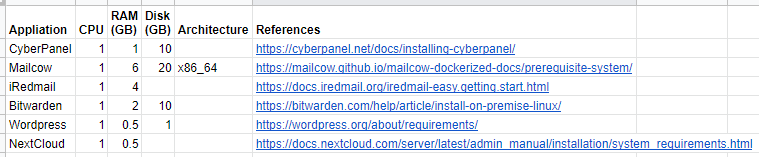
Because the AWS reserved instance has such a small memory footprint it will be limited in the usefulness of what it can offer. Based on the software requirements for memory (and given that NextCloud requires a lot of storage) that means the AWS instance can only run WordPress which makes since given that the AWS Lightsail instance that runs it now has a similar configuration.
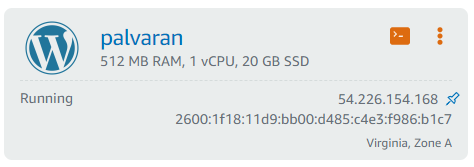
However, WordPress can also run on CyberPanel which means that the website can just be migrated to any vendor. The AWS instance can be decommissioned when it’s reservation runs out, but I digress.
The first thing we need to consider is where our nameservers which perform all of the DNS resolutions are going to go. In theory, with multi-cloud, you would want them to be on separate clouds to maximize redundancy. Considering Cyberpanel requires 1 GB of memory that eliminates AWS and means our Cyberpanel installations will be on GCP and OCI.
Next, will we be performing load balancing on our nameservers? The CyberPanel software does allow you to build a proper cluster, but you must upgrade to a professional or business license which means it is out of the free scope of this project. Our alternative is that this means manual syncs between the nameservers which should be doable based on the CyberPanel documentation.
There is another option and that is a network load balancer, but those are big expensive items that cost money which defeats the purpose of this exercise. Surprisingly, Oracle includes a load balancer in their always free tier.
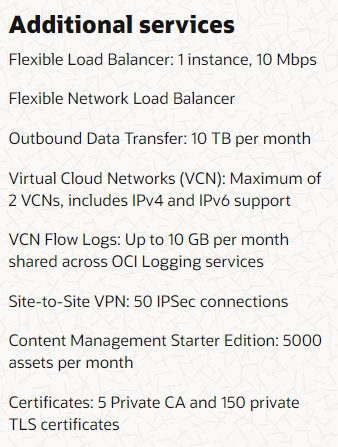
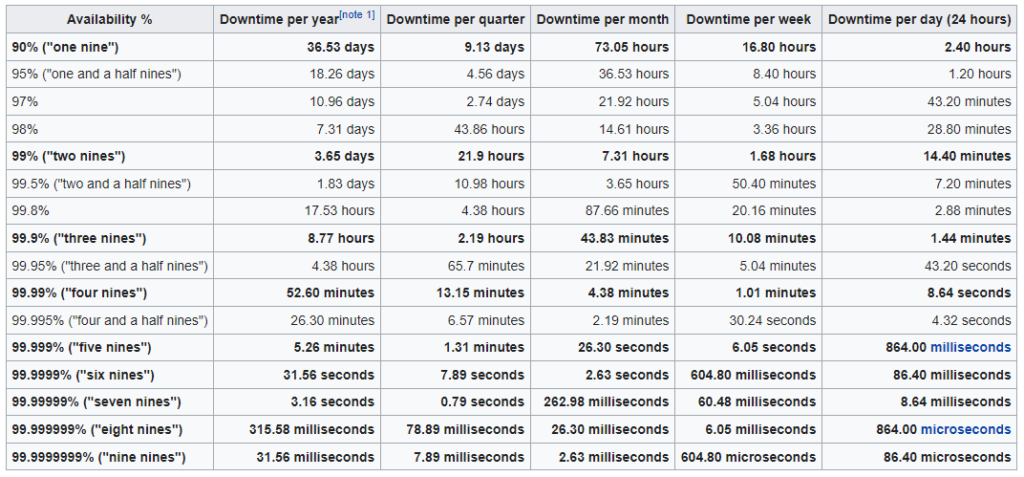
That means that we should place one of our nameservers on their cloud and therefore another one on Google. This will allow us to have servers always running as most cloud providers have uptimes in multiples of 9s. Combined with two separate cloud providers and the odds of two different public clouds having an outage at exactly the same time are statistically almost impossible. For example, Google Storage SLA is 99.9% or three 9s. AWS is 99.99% or four 9s. Combined that would be seven 9s. In terms of time, that is equivalent to 3.16 seconds a year of downtime.
Circling back to services, what about email? At first the plan was to use CyberPanel for DNS as well as our mail server and that meant using Oracle and eliminating iRedmail and Mailcow. However, during this process I discovered the importance of having access to Reverse DNS for Public IP addresses. You see, email servers are notoriously picky about who they allow email from and to increase the servers being trusted that means we need access to that. Not having a public reverse DNS record makes an email server feel like you are not trustworthy especially considering most attacks are from servers without proper reverse DNS records.
The easiest, free option for modifying reverse DNS that I have found between the cloud providers is Google. They allow you to modify the RDNS by adding a TXT DNS entry into your nameserver. Afterwards, the feature is unlocked showing that you have access to write to the domain’s list of servers.
What about NextCloud? Where do we put that? Well considering the key element of NextCloud is storage and given that Oracle gives us 200 GB of block storage, that means Oracle is the logical choice.
If we run Bitwarden, then based on the requirements needing 2 GB of memory that eliminates everything except Oracle, but specifically the ARM server with 24 GB of memory. Does Bitwarden run on ARM? Yes, it does.
Overview of services and locations
GCP = CyberPanel (ns1.ideasquantified.com), Mailserver
OCI = CyberPanel (ns2.ideasquantified.com), Docker with NextCloud, Bitwarden, etc. Possibly use load balancer for the nameservers to direct traffic.
AWS = WordPress (until migrated)
Migration
Now we need to consider migration. How can a user get their data from current services such as WordPress? Well, WordPress is handled by a simple backup and restore from inside wp-admin. The other applications will need to be looked at for their export/import functions.
Prerequisites
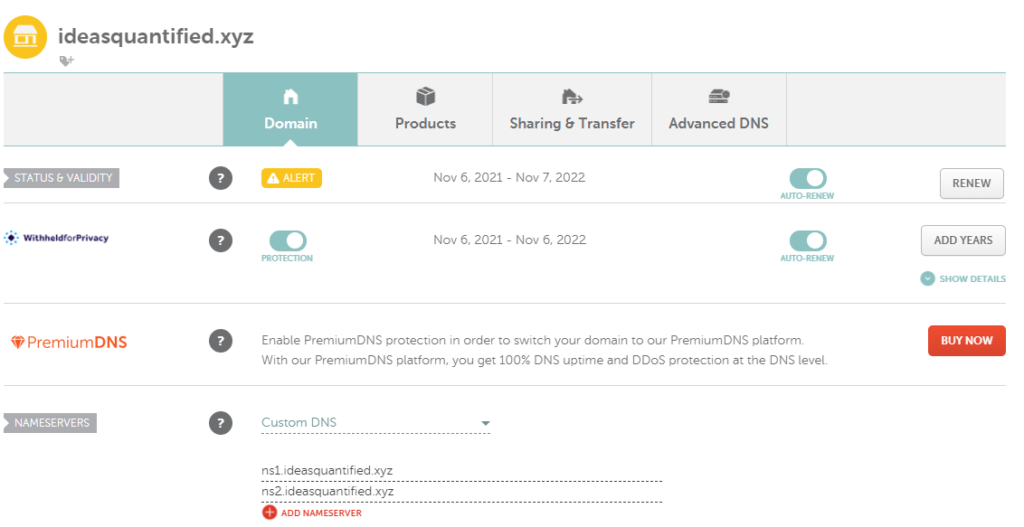
One thing we will need for this test is a domain. As ideasquantified.com is currently in a production state and being actively read, I did not want to disrupt it. Instead, I picked up ideasquantified.xyz for $1 from namecheap.com. I then created a custom nameserver and entered in the names and IP addresses of the servers I was going to use.
Build time
Starting with our nameservers, let’s start with Google and then head over to Oracle. Now let’s get cracking.
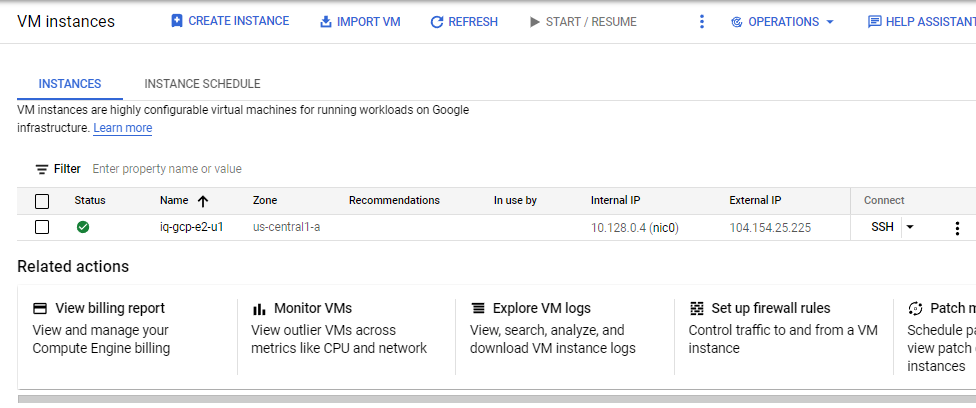
Google Exploration
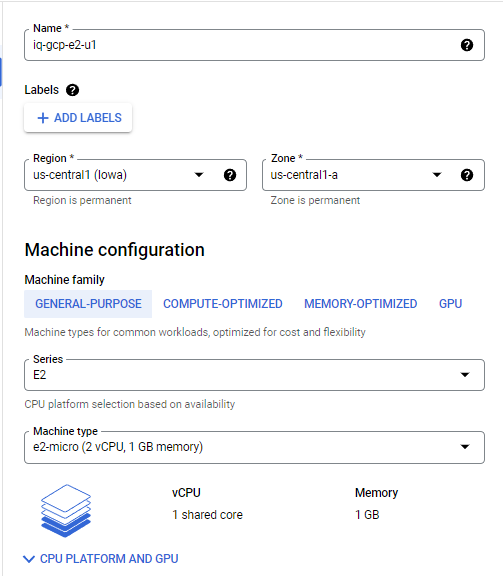
The GCP free tier includes one e2-micro VM with 30 GB of storage. The e2-micro has 1 GB of allocated memory.
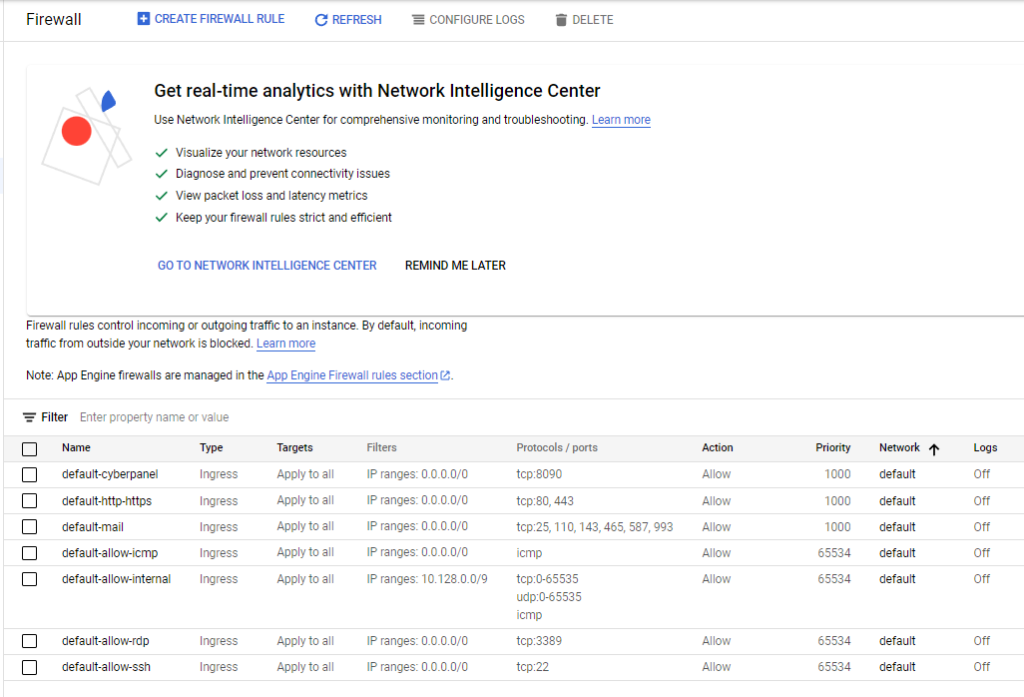
Important Note, you will need to modify your firewall to allow some ports to be open. As this is a POC project I did not fully isolate as you should with your network as well as implementing vlans, NATs, and other layered strategies.
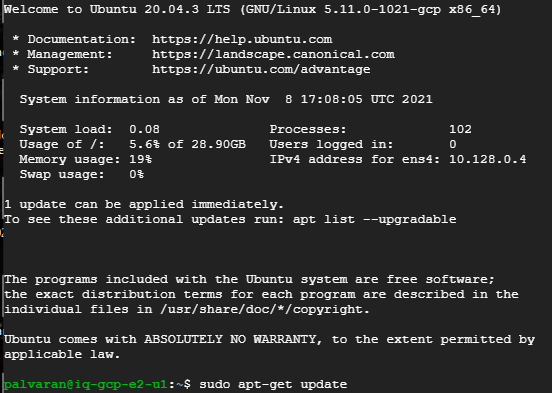
Using Putty or another SSH tool, login to the VM. I always like to patch right away.
One more step to the patching process.

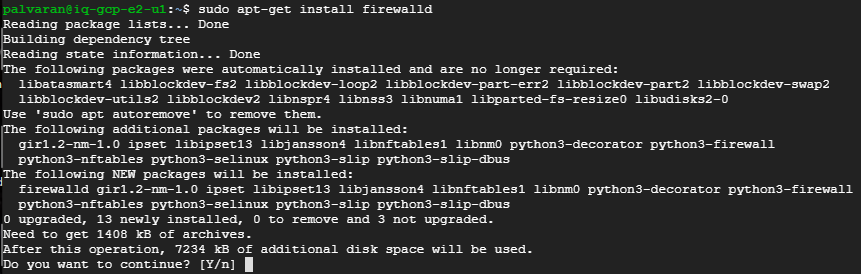
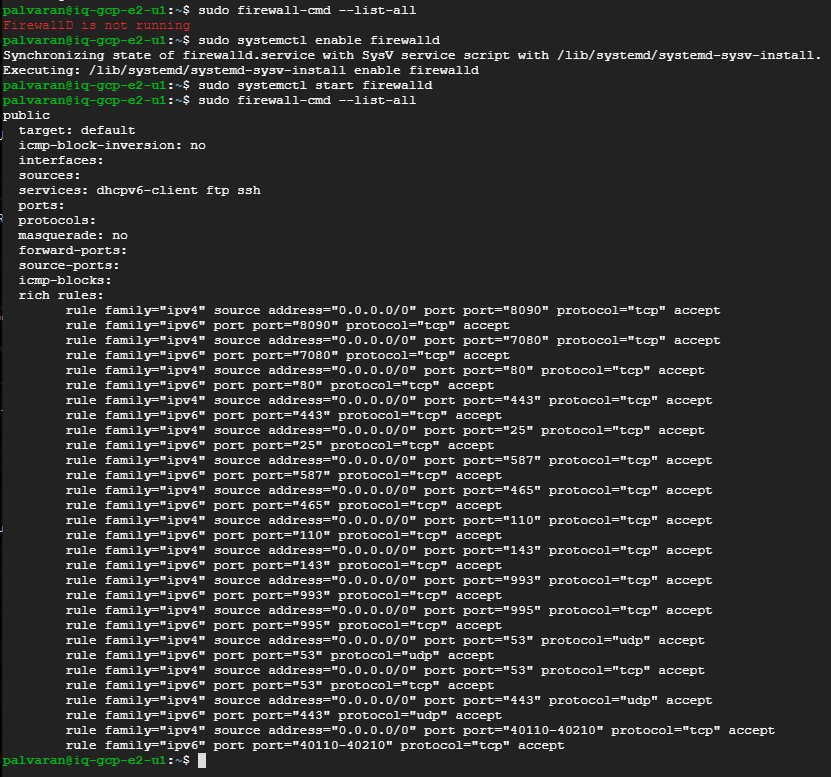
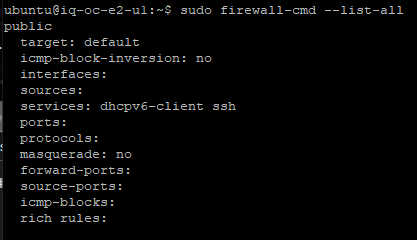
Now we need to start the firewall tweaking process some.

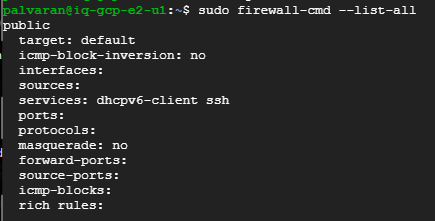
You can verify the firewall now.
Now we need to change to the root user in order to install CyberPanel.

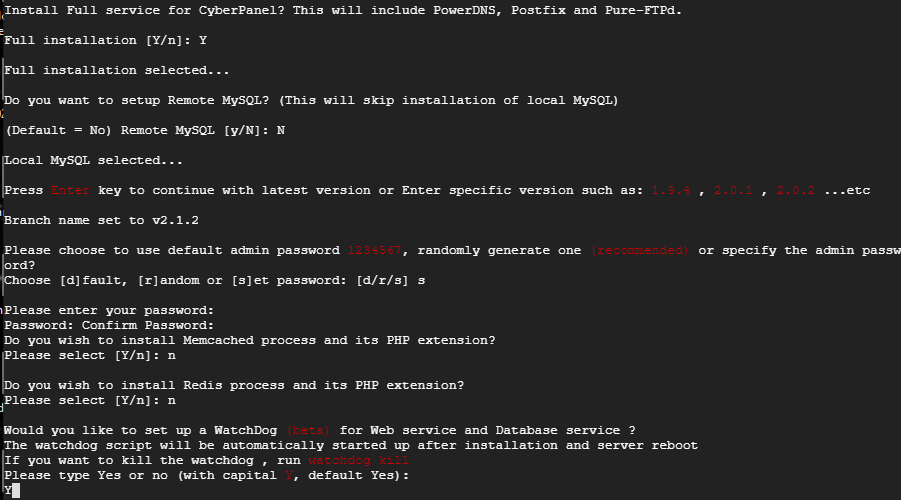
Time for the install.

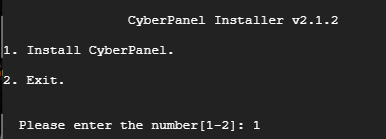
For our project needs we are going to use the community version rather than the Enterprise version.
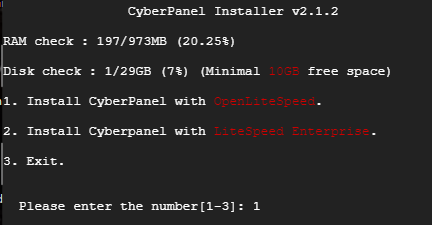
Here are my selections.
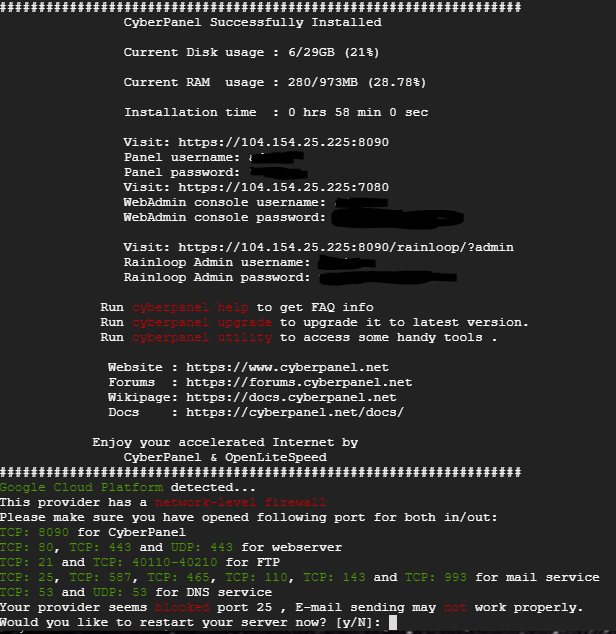
When it completes it should look like the following. Notice the Disk and RAM usage are low. Linux is very efficient. Make sure to save the login information below. You will need it to configure Rainloop for Webmail later.
Reboot and check the firewall again. I forgot to add the firewalld to the systemctl on a reboot.
We can’t configure CyberPanel until after we get both nodes ready so let’s move on to Oracle now. It will be interesting to see how hard it is to set up without any training and using my existing AWS knowledge.
Oracle Exploration
The OCI free tier includes two e2-micro VMs with up to 200 GB of storage and 1 GB of allocated memory. However, what I noticed is that we can not set the disk smaller than the default boot size of 46.6 GB.
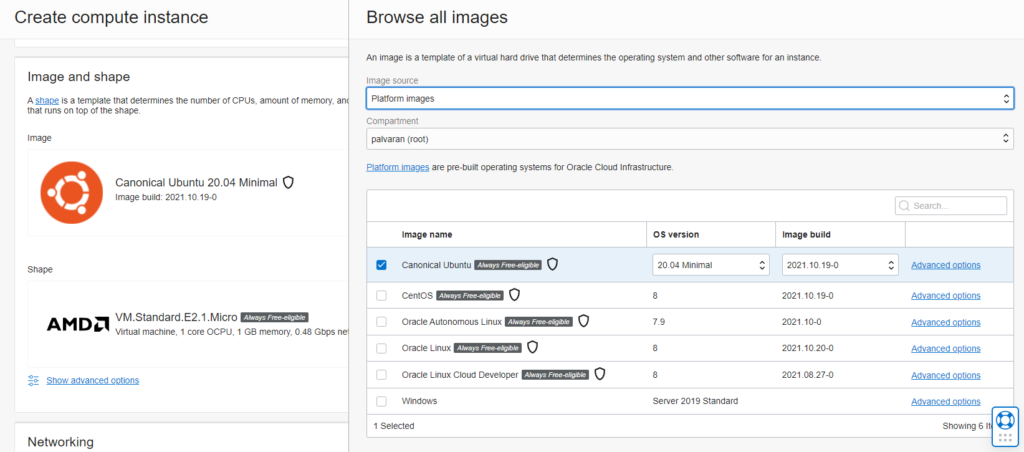
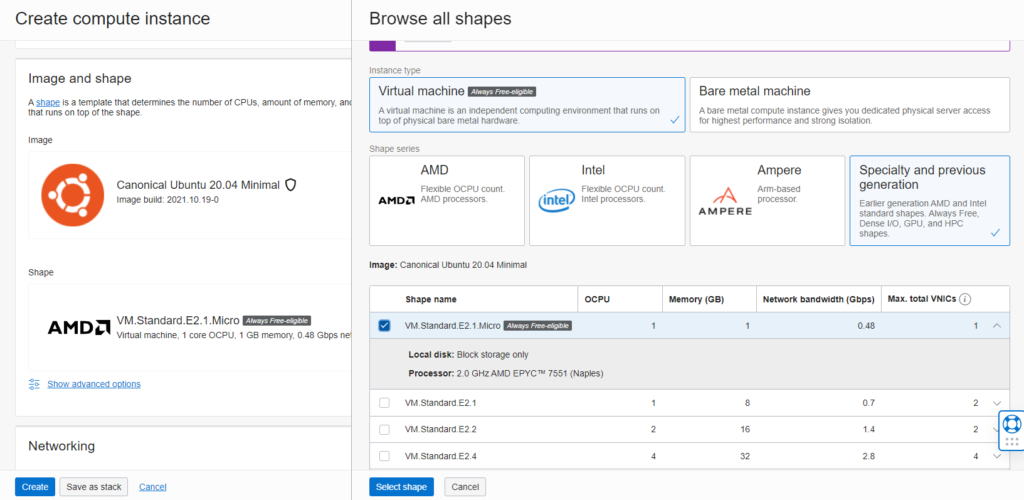
Oracle does things a little differently. They want you to choose an image (OS) and a shape (hardware profile).
For the OS, by default they want you to use their Oracle flavored version of Linux, but I am more comfortable using Ubuntu so I am using that for now. Note, I choose 20.04 as it is LTS and the minimal variant since I do not need a GUI. This also reduces the memory footprint as well as security vulnerabilities.
Now we need to choose a hardware profile. Here is the e2-micro.
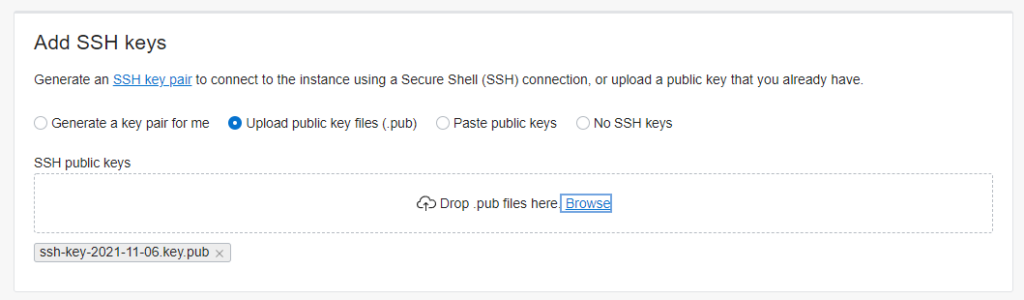
Now you can generate or upload a public key.
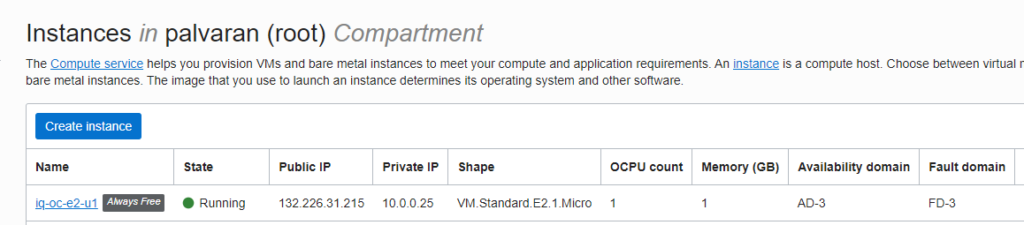
Here is what it looks like in the OCI console.
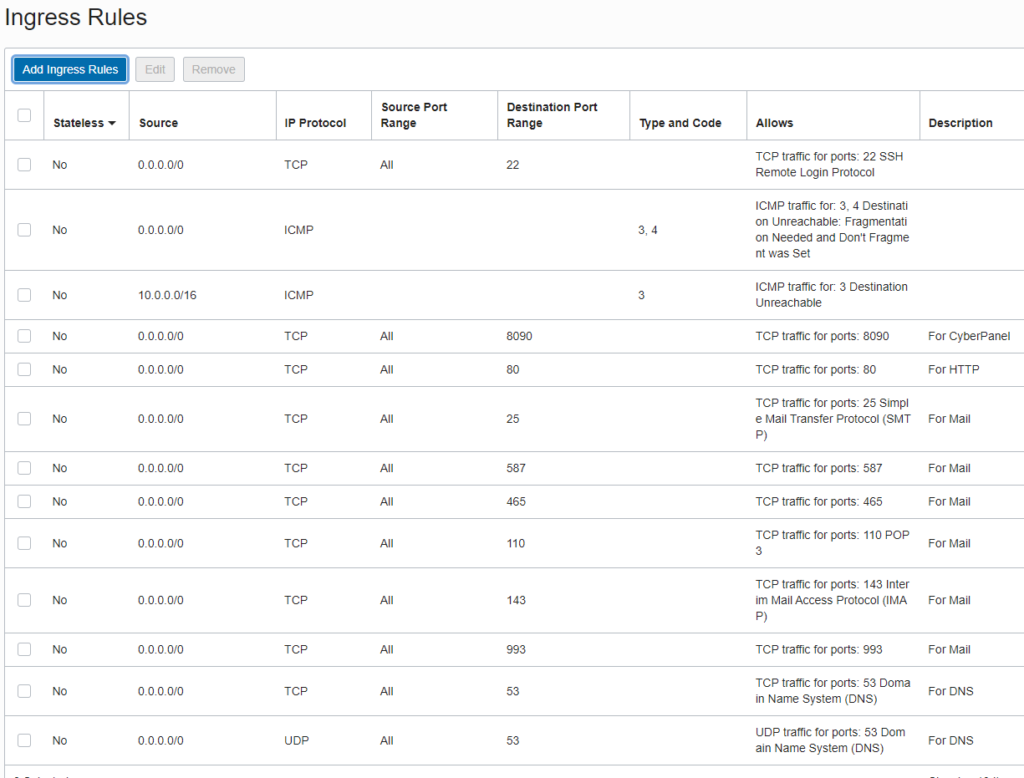
Don’t forget to customize the firewall. Again, this was a proof of concept so please use a layered network and security strategy. Not every port needs to be available to all servers. Use tags, vlans, NAT, and other tricks at your disposal.
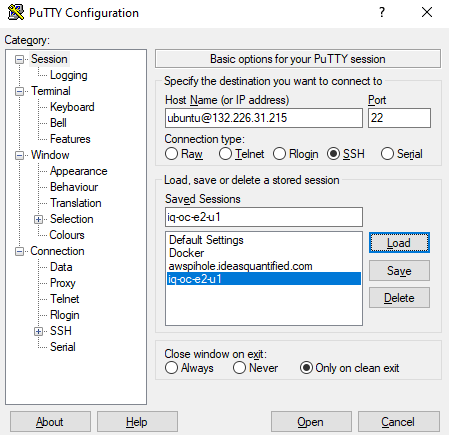
Using Putty or another SSH tool, create your entry for the VM.
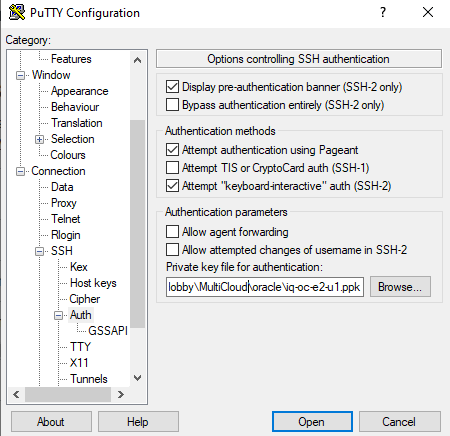
Inside the Connection\SSH\Auth area put in your public key. If you have not done so, you will need to convert the SSH key you got using PuTTYgen.
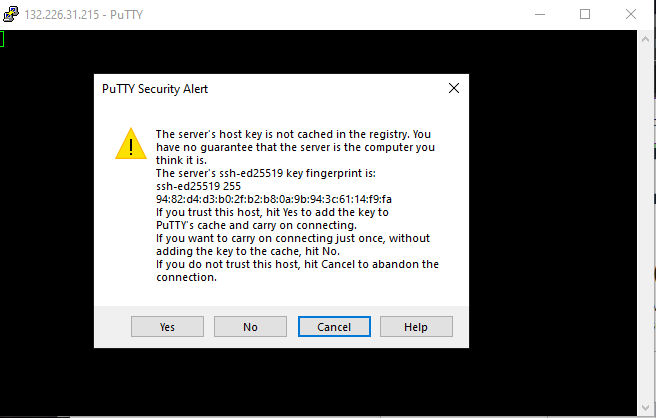
Accept the Security Alert.
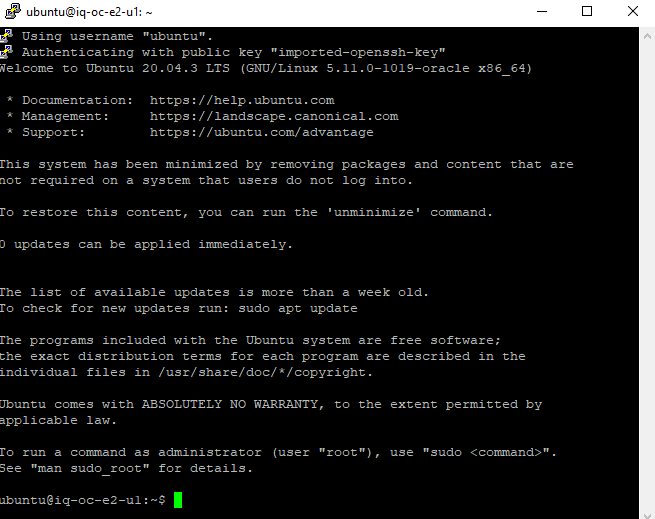
It’s always nice to login to a fresh server build.
I always like to patch right away.

One more step to the patching process.

One difference between the GCP and OCI Ubuntu is that the OCI does not include CRON for running scheduled tasks. You will need to add that.

Now we need to start the firewall tweaking process some.


You can verify the firewall now.
Now we need to change to the root user in order to install CyberPanel.

Time for the install.

For our project needs we are going to use the community version rather than the Enterprise version.
Here are my selections.
When it completes it should look like the following. Notice the Disk and RAM usage are low. Linux is very efficient. Make sure to save the login information below. You will need it to configure Rainloop for Webmail later.

Reboot and check the firewall again. I forgot to add the firewalld to the systemctl on a reboot.

Replication Time
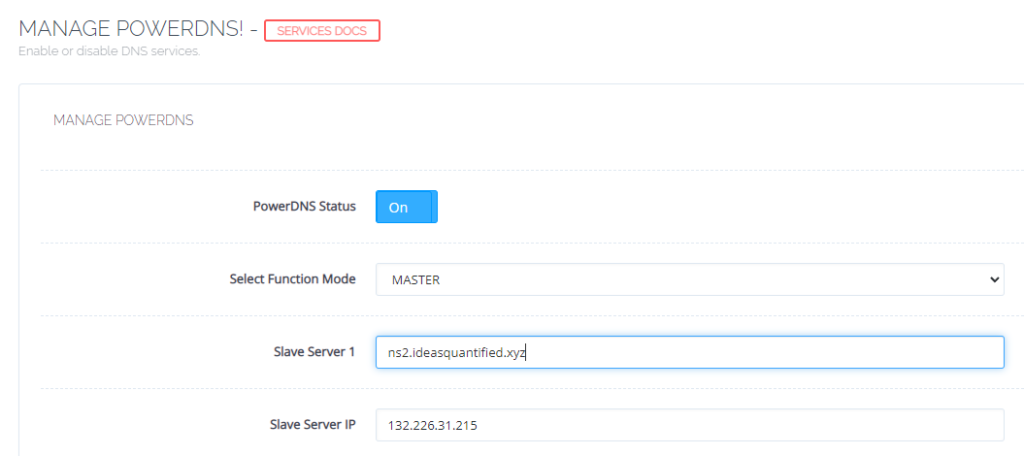
Now that we have setup both VMs as well as installed CyberPanel, it is time to configure PowerDNS and replication. The following is taken from CyberPanel’s documentation.
Login to the primary nameserver. The configuration is at https://<SERVER>:8090/manageservices/managePowerDNS
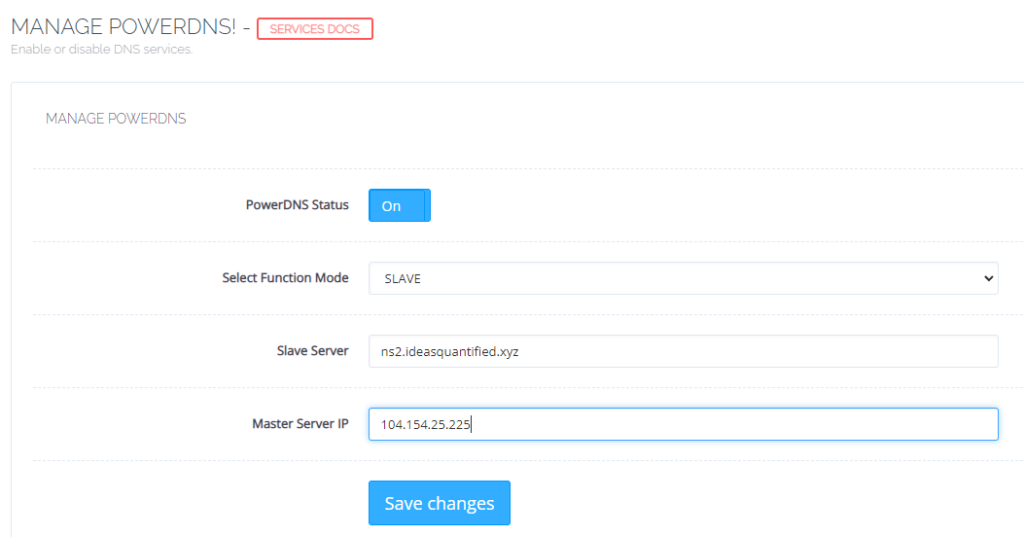
Now we can configure the replica nameserver. The configuration is at https://<SERVER>:8090/manageservices/managePowerDNS
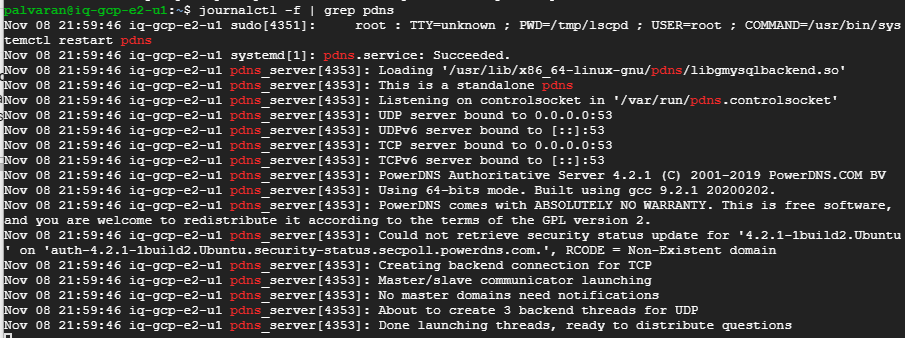
If you are wondering how to verify it is working you can run the following command on the replica server.
I decided to go ahead and time the installation process of CyberPanel on both OCI and GCP. I wanted to get the Virtual Machines to install at exactly the same moment and time the result on both cloud providers to see if there was a performance difference or not. Surprisingly, the Oracle VM was faster for the CyberPanel installation and ended 27 minutes 1 second before the Google VM did. Let me repeat that for emphasis. The Google VM was 27 minutes slower than the Oracle VM. I know, I was surprised too, but free is still free.
Domain Setup
Now that we have replication working, we can move on to define our domain.
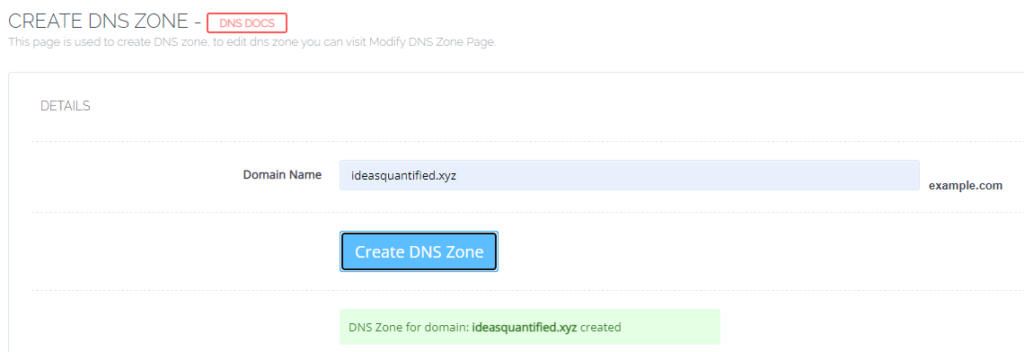
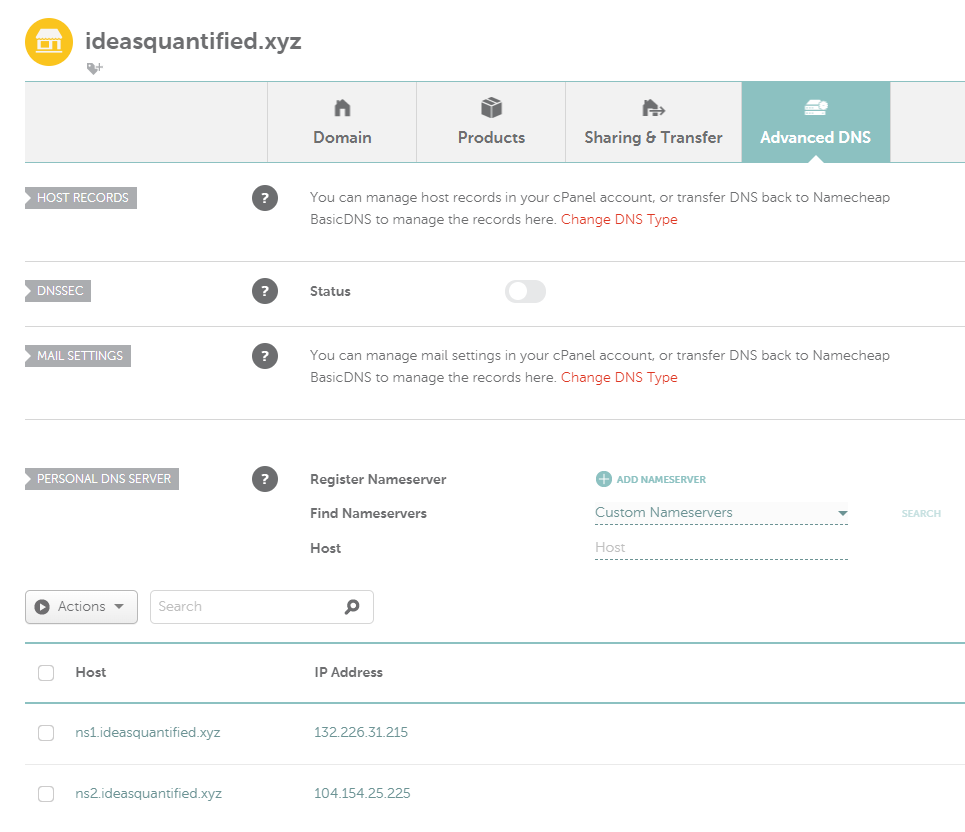
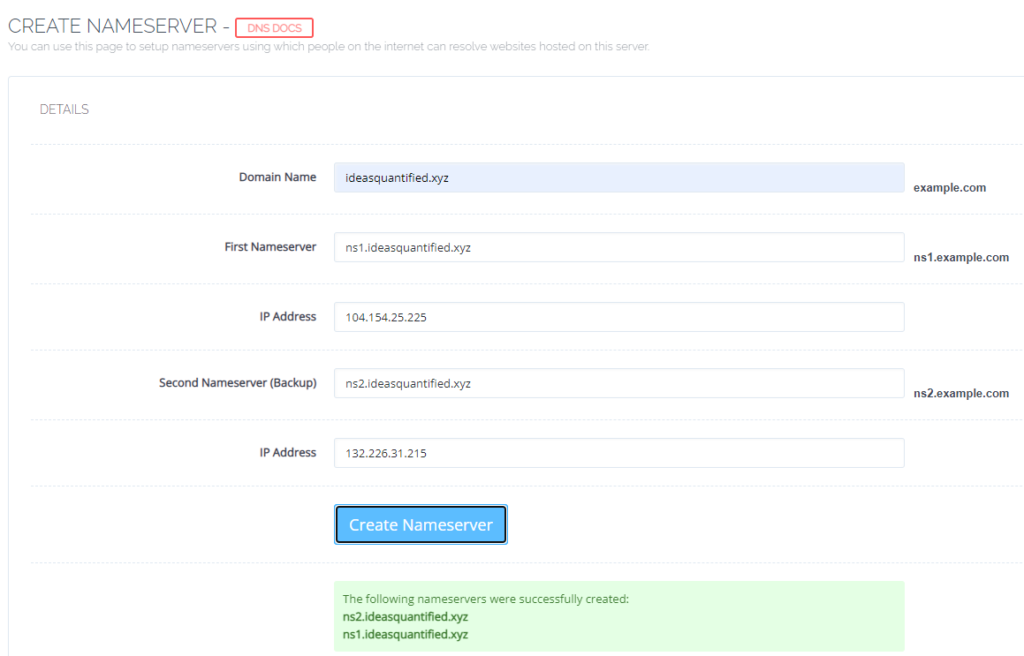
Now, we need to enter our nameservers exactly as we listed them on our domain registrar, in my case, namecheap.
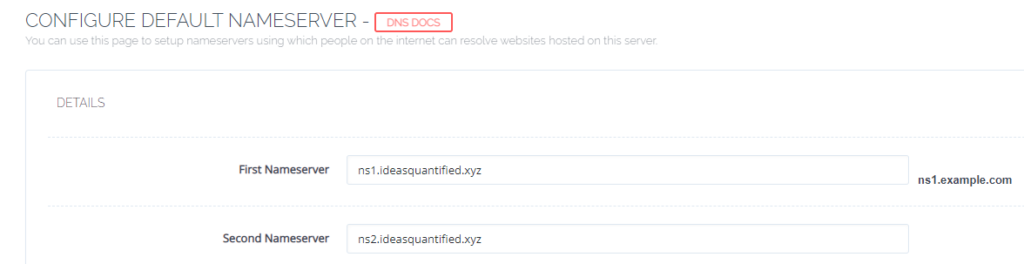
Make sure to enter the IP and names are here as well.
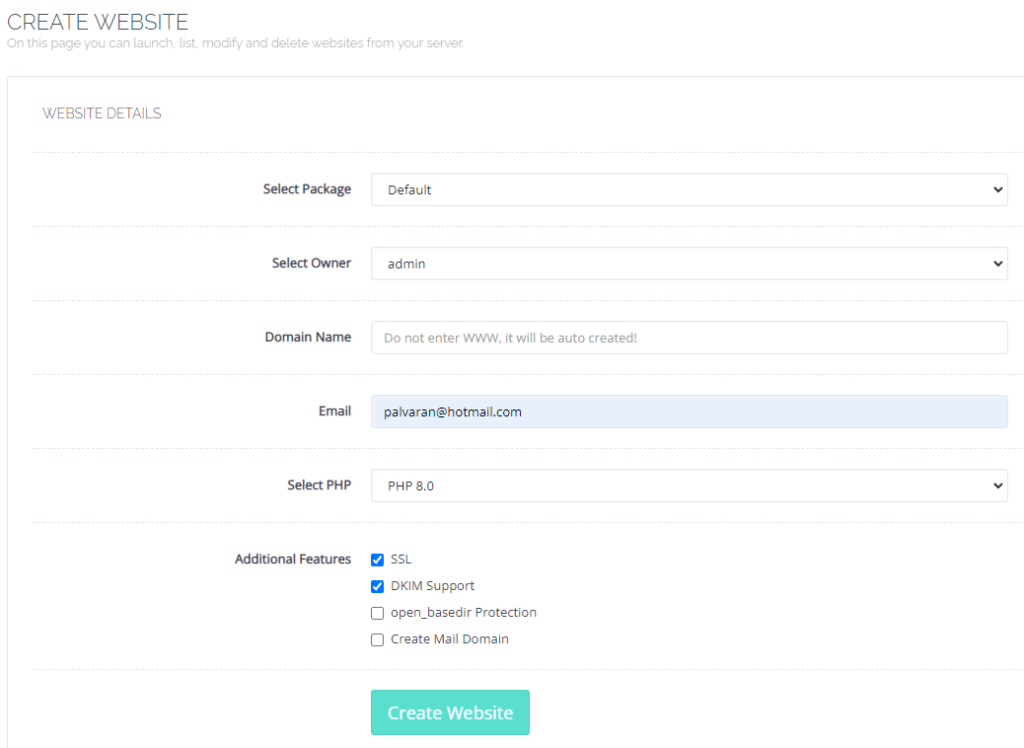
Next, we need to create our default website so that we can get DKIM support which will allow our email server to be trusted by other email servers, provided we have reverse DNS working.
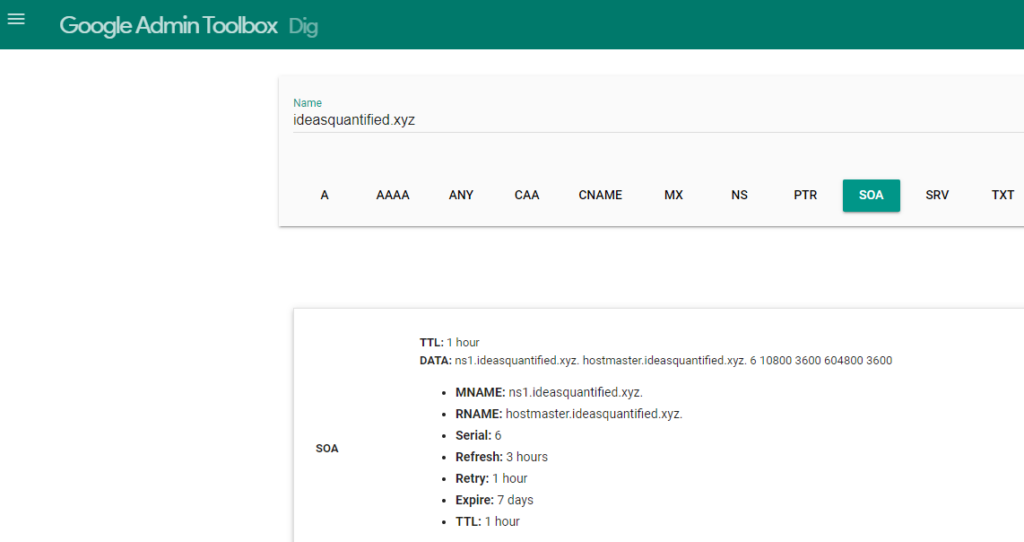
Before you continue, make absolute sure your DNS records are working correctly. For example, when I first tried to ping ideasquantified.xyz, I was unable to resolve the name even after updating the nameservers on namecheap and CyberPanel. After researching I figured out the problem was not the nameservers, but the SOA record.
SOA stands Start of Authority. It is the record which says this is the domain and this is where you can go. In my case, CyberPanel had created the SOA record automatically which was great, but it did not work. After comparing my ideasquantified.com SOA record to my ideasquantified.xyz record I noticed an anomaly. Do you see it?

A single period is missing inside the line for ns1.ideasquantified.xyz at the end of the xyz. The period denotes the root of the domain. Without it, the server is unable to process the information correctly. I am not sure why CyberPanel did not create it correctly, but once I put the period in it appears to work now. You can verify your records inside Dig, MX Toolbox, and other utilities.
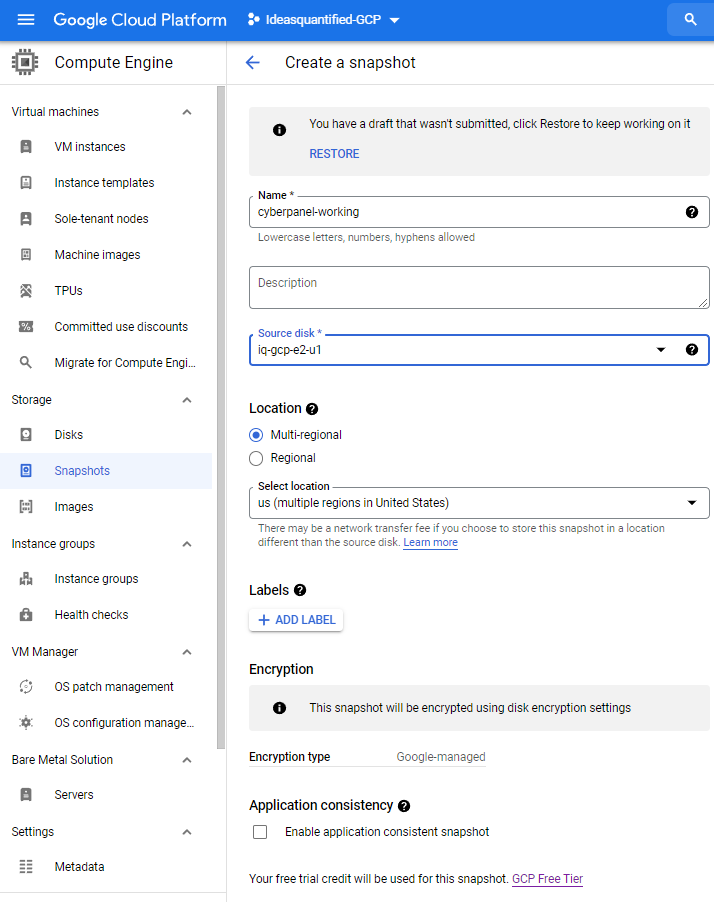
Hopefully, things are working properly for you if you are following along. At this point, you might want to save your game state. To do that, you can create a snapshot. As a reminder, you can use snapshots to create a new VM if you desire. Something that might not occur to you though is that you can use those same snapshots to convert between encrypted and unencrypted disks.
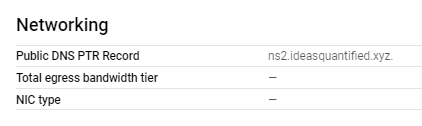
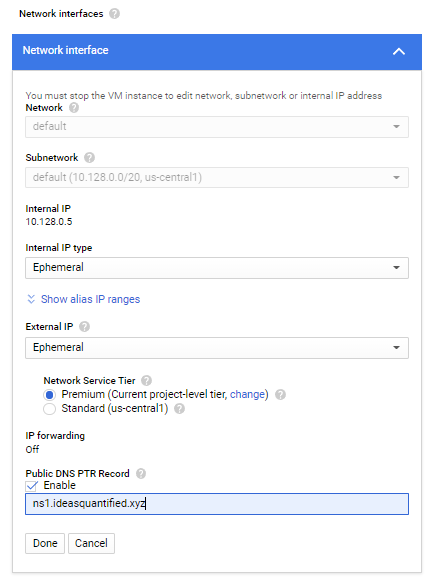
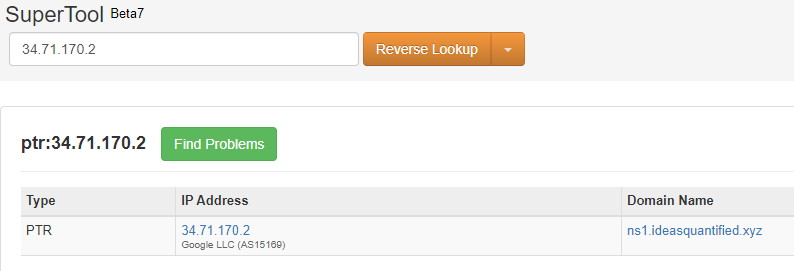
Another important step is that now that we have the DNS functioning, we can update the Reverse DNS for Google. First, you will need to verify that you have ownership of the domain. When you do, you will get a page that looks like the following.

Next, the ability to save the value will be available.
Once it saves, on the main screen from the VM you will see the following.
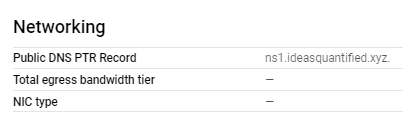
Let’s verify it one more time.
Summary and Closing Thoughts
Whew. If you have made it this far, congratulations. This took a lot of time to test and write with several attempts to iron out the steps so that they will hopefully be smoother for you. After writing this for days I decided this was a good stopping point due to length and what has transpired. In upcoming articles, using this as a foundation, I will explain how to setup your own email server using the cloud infrastructure we have just setup, build proper mail related DNS records, and even get around how some servers block port 25 as well as flag incoming mail as spam. I will also explain how to setup your own WordPress server and migrate from an existing server. I will show you how to get Docker working with different containers as many of these services are using that as a core component.
In summary, we have analyzed four of the public cloud providers (Oracle, Google, Microsoft, and Amazon) for what their free offerings are. We then setup two servers on two separate clouds for increased high availability as well as configured our own custom DNS to host our own websites and servers. Additionally, we configured replication between the servers for increased resiliency.